Thursday, June 27, 2013

With Sympathy

     Yes, I needed a Sympathy card for a co-worker.  Her father passed away very unexpectedly the other night.  It was with sadness that I sat to create this for her.  While looking for inspiration I found several card styles that appealed to me.....most cards of this nature seemed to be fairly simple.  There was one card I came across that had used the Lords Prayer in the background - then I looked through some of my old creations and some ideas began to form.  Like most cards, this ended up a little different from how it was intended to look, and that is a good thing - I liked my original ideas, but this turned out even better.
    Not owning a stamp with the words to the prayer I computer generated them, repeating them about nine or ten times.  After choosing a paper color I then coordinated the color of the ink for the words to the paper. Once they printed out I used my circle Spellbinder die to cut out the image and a background layer.  Then I inked up my Penny Black floral stamp with some Brilliance Pearlescent Jade and stamped it over the words of the prayer, Cutting off a small side of the circles I placed them on my card and created a floral design on the opposite side to balance the card with some Prima flowers, and foliage with my Martha Stewart punch, and Cheery Lynn die.  To finish this off I used some ribbon from Really Reasonable Ribbon and a metal die Cross from Momenta.

  The card dimensions are 5.5 by 5.5 and with the flowers would not fit into a normal envelope, so I made a small box to place it in.  There is a belly band with a fancy punched edge, with another Martha Stewart Punch, and matching ribbon from the card to go around the box, topped with a frame stamp from Our Daily Bread Designs with their matching die.  (Need to place her name on this)
     It is a very peaceful looking card - inside I computer generated the sentiment: Although its difficult today to see beyond the sorrow, May looking back in memory help comfort you tomorrow.  You and your family are in our thoughts and prayers.

Supplies:  Prima Flowers, RRRibbon, MS punches, Spellbinder Die, Cheery Lynn Die, Our Daily Bread die and stamp, Brilliance Ink, Computer, The Paper Studio CS, Momenta Metal Tag. 

Challenges:  Simon Says - Anything Goes, Word Art Wednesday - Anything Goes, Wednesday Creative Inspiration Challenge, A.R.T. Challenge Blog, Anything Goes

Thursday, June 20, 2013

Fishy Birthday

     Yep, I have had a few days off - that means play time!!!  Of course my stamp room is a mess, so my first thoughts this morning were 'clean it up before you play'.  Normally that would mean put the Copics away, refile all the dies you have laying around, give myself some workable space......but I have several projects in the 'half finished' mode laying around, so today I decided 'cleaning up meant 'finish those cards'!
     Since before Christmas (yes, that long) I have had a piece of acetate sitting that I ran through my Cuttlebug to use as an overlay.....for whatever reason after I ran it through it ended up in a corner of my desk.  Then about two weeks ago I saw it and began to think of using it - I actually dug some old paper out from a scrapbook set a friend gave me.  Once again the card got laid to the side.  No more, today I finished it.  It is going to go into my Birthday stash, I'm thinking this will work for a guy, with a sentiment on the inside and a few waves and fish to finish it off.
     It was great fun putting this together - like like the look of the embossed acetate and will certainly be doing more of this in the future.

Materials:  Cuttlebug School of Fish EF, Cardstock, Spellbinders Circle Die, Stampin Up Bliss Blue Ink, Inkadinkado Stamp

Challenges:  Use it Tuesday #57 Masculine

Wednesday, June 19, 2013

Love & Happiness.....

     I saw this layout and design posted on Pinterest by Jo Ham of Its My Creative World.  Can I just say she is one creative lady.  You may have noticed from several of my posts recently I have been making wedding cards for some friends.  It was while wandering through Pinterest one evening that I came across this beauty.  I CASED her work, changing the coloring some, I also changed  the sentiment and die it was printed on, and instead of  using a flower I chose some different embellies.   Jo designed this half round step card for use with a Silhouette, I just had to download it and try it on mine -- I love step cards and just couldn't pass up this great shape.
     There is a learning curve on the Silhouette and on this card I learned several lessons I thought I would share.  First, Jo said in her blog that after cutting and folding you would have to cut the excess outside edge, no problem.  My little experience with Silhouette has taught me that the dashed lines for folding can get a little worn and sometimes tear easily if you are too rough - it took me two tries on this card to get it the way I wanted it.  What I learned was that right after cutting those excess edges, take the time to then adhere the background while it is laying flat.  Playing around too much with my first one caused some stress on the fold lines. I also discovered that the pieces she included in the cut file for the background weren't really to size - while they fit the main circle, the edges of those change after you hand cut it......I am going to play around and see if I can change her pattern and save it.
     The image is from Mo's Digital Pencil -- ya'll know how much I love Mo's designs).  The lovely couple was colored with my Copic Sketch Markers....I also used my Gelly Roll Clear Star pen to give some sparkle to her gown.  I ran my Cheery Lynn small flourish die through my Cuttlebug about 4 or 5 times to create the embellishment behind the couple, the white background was also run through the Cuttlebug with a Valentines embossing folder. After generating my sentiment on the computer I lined up my Opulent Oval die over it and cut it out adding a darling little Dove from Jolees.
     Know that I fell in love with this card and was obsessed all day putting it together.  Using my Silhouette is still very new to me - it can do so much and I know so little.  If it weren't for great tutorials by ladies like Jo, and others I have pinned, I would be at a loss - they inspire me to practice, practice, practice using this fine machine as a tool in my paper crafting world.


Materials:  Silhouette, Mo's Digital Pencil, Copic Sketch, Spellbinders, Jolees, Cheery Lynn, Cuttlebug, Gelly Roll

Challenges:  Word Art Wednesday - Anything Goes
  

Saturday, June 15, 2013

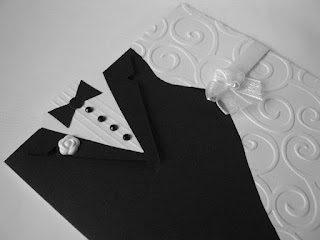
I Do!


    The Inspiration Challenge today at Splitcoast is to find inspiration at Uncle Dan's the Great Outdoor Store.   Recently I have had several requests for Wedding cards.....I enjoy making these type of cards, but more often than not I create 'white on white' cards when I make one. Seeing this sandal I was inspired to finally make a wedding card that wasn't ALL white and I decided to follow through one some other inspiration using a design I came across while "Pinning'  Here. 
     Following the pinning trail led me to the very talented Tilly McLeod who I discovered is a fellow Splitcoaststamper.  Not wanting to recreate the wheel, so to speak, I pretty much CASED her card from Pinterest.  I took a little time and several templates to get the right fit and size (and you can bet your sweet bippy I saved those final templates....I have pushed those kinds of things into the scrap pile and lost them way too often).  


    If I were to make this again -- and I probably will -- I would use black linen paper for the tuxedo and might consider some glimmer mist on the brides dress....don't you love the ideas that come to you when you finally create a project, guess that's what keeps me playing in my stamp room.  
     I was just thinking that the men's sandal that inspired me might look kinda nice with this tuxedo if it was a beach wedding.....maybe they could find a matching pair.

Supplies:  Black and white cardstock, Cuttlebug Embossing Folder, Ribbon and bow, Recollection rhinestones, scissors

Wednesday, June 5, 2013

Spring into summer

     I was working on this image before vacation, and feel like I need her finished up with Summer around the corner.  This image so reminds me of my bestie Vicki.  We are complete opposites and often laugh about it.  I am an early riser, she hates mornings - I am ultra conservative, she likes to pretend she can be, but is much more liberal than I am - she loves to relax in her garden, I do not have a green thumb and look for reasons not to grow things.  When I saw this image at Mo's Digital Pencil I just had to click 'buy' and add her to my collection.

      For my inspiration today I used the Sketch Challenge 439 over at SCS shown above.  I turned my card sideways and changed the shapes up a little.  There are days that challenges like this can be great inspiration when your trying to finish projects up.  The original design was somewhat similar, but I am glad I let the sketch inspire me.

Materials:  Mo's Digital Pencil Image and Sentiment, Cheery Lynn Flourish Die, Spellbinders Oval Die, Corner punch, MME Paper, Copic Sketch Markers, Ribbon


Tuesday, June 4, 2013

Ruh Roh ......

     Ruh Roh - Rocco is in the doghouse.  I am catching up with cards I need to make, while I was on vacation I missed a few birthdays.  Like "Rocco" I think I need to be in the doghouse for not being better organized.  I couldn't wait to color up this sweet little fella from Mo's Digital Pencil.....the fun was in deciding what markings to give him since this particular digi is mostly an outline, I love that belly I gave him, and who doesn't  love that 'oops - I think I'm in trouble' look he is sporting!   I found the tennis shoes in my clip art file and printed them up and fussy cut them out - Rocco is responsible for the piece missing from one of them, you can tell from the guilty look on his face as well as the tenny hanging from his mouth, tee hee.  For the front sentiment I dug out my Sizzix "Wingo Zingo' Alphabet - while I have owned it for quite some time - this is the first I have used it....it wasn't as dusty as I thought it would be :-)
     The sentiment on the inside says "I'm in the doghouse for missing your Birthday, Hope it was a good one"    What fun it is coloring Mo's images - next goal is to learn to merge some of her images together and layer them.  Need to get Photoshop and practice.....I have a few in my Mo's file that would look great together.

Supplies:  Copic Markers, Spellbinders Die, Sixxix Letters, Cardstock, Clip Art from Computer

Sunday, June 2, 2013

Wedding Bells.....


        A co-worker requested a wedding card recently and when I think of wedding cards I always think white on white, flowers, pearls, and possibly butterflies.  So to make this little beauty I dug out my floral oval die from Spellbinders (a go to die on a pretty regular basis for me).  During a trip down the paper aisle at Jo-Ann Fabrics recently I found this lovely Ivory Floral on White Matte paper, it seemed perfect for a wedding or anniversary card.  After cutting my two Floral Ovals, I cut a regular Oval from some Pearl Vellum paper.  Once they were layered I generated my sentiment on the computer and then used Label 18 to cut around it, which I also backed with some Pearl Vellum paper that I fussy cut around to mimic the die shape.  The basic layout of the dies was inspired by a card I saw here by Sistersandie at Splitcoast Stampers.  I generated my own sentiment so I could match the fonts to the scripture I am putting on the inside.  Her easel card was very inspiring and beautiful.

Supplies:  Spellbinders Dies, Computer, Cardstock, Pearls, Vellum

Challenges:  Stampin' for the Weekend, Monochrome,
01 09 10