Wednesday, June 19, 2019

Pull Up - Pop Up Card Tutorial

A tutorial for using the Silhouette to make a pull up - pop up card.

Sorry I don't have my video hooked up and so this is a picture tutorial for those who asked when I posted this card on Facebook. I apologize in advance but this tutorial assumes you can print and cut with your Silhouette - its a learning curve for some but do-able.


There is a link to my blog on Facebook post  that contains the Silhouette Cut file I created to make all the pieces of this card.  Open that file on your Silhouette and print the file below and then load it onto your mat to cut. Remove the cut file from your mat and score it at 4.25 inches.


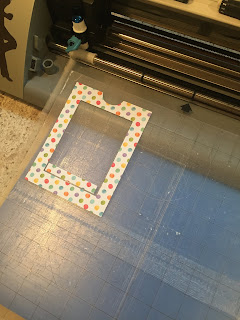
Fold the card back over the sentiment - and then cut your designer paper out using the SIL


Apply your designer paper to the front of the card - where the score cuts are do a prefold  so they look like the below picture - add the small cut of designer paper to the bottom flat fold.

Print and cut the sheet that has the word pull, the knitting needle embellishment and the front sentiment.  Remove them from the machine and lay them aside.

With your card laid out with the sentiment side up adhere some double sided tape to the very bottom of the cut out part. NOTICE I HAVE LEFT A SMALL PIECE PULLED AND TURNED DOWN.  I find it easier to pull the tape off after I have aligned it if I do it this way.


Take the cutout that says pull and align it in the middle of the half circle on the front of the card.  Once aligned hold it still and flip it over - the piece of tape should be sticking out and if you lay the card flat gently with the pull out in place you should be able to remove the tape by gently pulling and then pressing the paper down (the bottom of the pull out cutout should align with the bottom of the pull up.

 Place some double sided adhesive along the bottom and side of the card (see picture below).  When you remove the tape you should be able to fold the card at your scored line and it should line up.


 Adhere double sided tape to the front of the mountain fold on your card - this is where the sentiment will go.
 Place your sentiment at the fold line just barely above the scored line and add your embellishment and your card is finished.  
I hope you found the directions easy to follow and make a few of these adorable Pull up - Pop up cards. 


Materials used:  Silhouette cut file by Sherry Kushibab, Silhouette Cameo Machine Designer Edition, Printer, double side tape

Monday, April 2, 2018

Easter - He is Risen


The idea for this card using a tomb background was in my head last year - I tried several layouts and finally put them away in a file....revisiting the idea again recently.  None had the impact I was looking to achieve for this stunning image.  At last I had a 'light bulb' moment and decided to use a "Z" fold card to be able to fit all the images I wanted this card to have. 
The image of Jesus on the cross is a digital stamp (that I have used several times) - it was colored in Copic markers and popped up on the front of the card.  The tomb was the real challenge, you just don't find tomb stamps on the market.   I used some other digital art that was basically the tomb entrance and embellished it with my fine point sharpie marker.  I had a small rock stamp that I used and scanned, flipping it to create the surrounding ground.
When the card is folded flat you do not see the tomb entrance- instead you see the cross and the rocky background - this conveys the Good Friday message I was hoping for.

When you open the card you see the full picture - Easter is so meaningful to me as a believer I really wanted a card with impact!  To me this portrays how death could not hold HIM.

Whenever I do this style of card I put my sentiment or message on the back - there is also a place on the separate small flap for my logo stamp - then it all folds down nicely to fit in an envelope.  I couldn't have done this card without my Silhouette Cameo to cut the panels and background.  I also imported the images and used it to cut them out.
I will admit this card took some work, mainly because I had an idea in my head and I knew I wasn't going to be happy until it became a reality.  This is exactly what I love about coloring and creating cards - the challenge of having the finished product look the way I saw it when I closed my eyes and imagined it.

Materials:  Digital image/stamp by Hassified, Copic Markers, Printer, Computer, Silhouette Cameo, card stock, Sharpie marker

Sunday, October 1, 2017

CAS - A Child is Born

Follow my Blog on Bloglovin

I don't know about you but it is looking a lot like Christmas in my studio - vinyl is being cut for pillows that will be gifts, cards and Advent Calendars are being made.......all of that started in late August and now it is already October.  To stay a little ahead I have been working on some Christmas cards - this week I decided to color up a sweet image of baby Jesus from Bugaboo Stamps. Keeping it simple I used my Silhouette Cameo to create the words in a circle, Baby Jesus is a digi stamp colored with Copic markers and placed in the center of the sentiment.  After printing it out I used the Stitched Edge Lawn Fawn die to cut the rectangle and highlight the edge of the card - and small gold die cut star was placed above the baby.  What you can't see in the picture is the Wink of Stella Clear that I used to highlight all around the digi image extending out to just inside the words....a lovely little hint of sparkle to surprise the recipient when they take the card from the envelope.


As someone who likes to create 3-D projects and embellish cards I had to work hard to keep this simple.  It works well because the image is so childlike and sweet and doesn't need much more than the message that surrounds it.  Thanks for looking have a great day.


Supplies:
Card stock, Digital image by Bugaboo, Copic Markers, Star die, Silhouette Cameo, Wink of Stella

Challenges:
Colour Crazy Challenge No 39 Anything Goes,  Jo's Scrap Shack FFC#208 Anything Goes With Lawn Fawn, QKR Stampede #263 Anything Goes with a Twist,  Winter Wonderland Anything Christmas Goes, Bugaboo Recipe Challenge, Simon Says Wednesday Anything Goes

Saturday, September 23, 2017

Stella Says Sketch Challenge

Sketch challenges sometimes frustrate me -I have my own ideas and having to follow a certain layout makes me have to think harder.  For many they are easier, simply cut your paper to the match the sketch layout and viola!  I usually have my image in mind and then have to decide how I think it will fit into the sketch.  The background of this changed several times, as did the image - and layers were added behind layers as I finally started laying out the image I had colored.  In the end it all turned out well, but it certainly took me longer than I thought (it didn't help that I uploaded the new Silhouette 4.0 recently and there is a whole new learning curve to using it that I am still working to figure out - ugh!) The picture really doesn't do this justice - I love the papers, the solid red and green are out of my stash and pretty old, the plaid is Rustic Noel by Paper Studio. 

This image is a digital from Bugaboo Stamps - I love the whimsical look and fussy cut around him.


What you can't see in the picture is that after coloring the scarf, hat and nose with my Copics I used the Clear Wink of Stella on the face to create a nice sparkly look on this happy holiday fella.

Thanks for stopping by.

Materials:
Bugaboo Digi, Silhouette Cameo, The Paper Studio, Copic Markers, Card Stock, Computer

Challenges:
Stella Says Sketch Challenge 514

Saturday, September 9, 2017

Recycling...

If you don't own any Bugaboo stamps you should.....some of their characters just make me laugh out loud.  This sassy character is JJ and what fun it was to ink her up and color her.  I used my Copic markers and when I was finished with the coloring I added a little touch of Wink of Stella Clear to the balloons, drink and her accessories for a subtle bling look (doesn't really show up in the picture but looks pretty cool IRL).  After cutting some red and yellow card stock I mounted her onto my card.
This is a digital stamp and includes all but the words Happy Birthday - I added those and the red line separating the image from the words using my favorite machine my Silhouette Cameo.  She was busy enough that I didn't think she needed to have any of the elements cut out and layered -so I kept it simple.  Keeping it simple is not always easy for me as I love look of layers and embellies.   I'm going to put her in a few challenges and then decide who she goes in the mail to as a Birthday Card.


Materials:  Copic Markers, Bugaboo Digital JJ, Silhouette Cameo, Card Stock

Challenges:  (PIN)spirational Challenge #198, The Ribbon Girl September Challenge Anything Goes,
If You Give A Crafter A Cookie Photo Inspiration,  AUD Sentiments Challenge Blog Anything Goes + a Sentiment, Creative Knockouts #21 Something to Say

Saturday, August 12, 2017

Santa Paws

Last weekend I colored up 8 Tim Holtz Crazy dogs for a set of cards (I still need to get pics and post them) - THIS WEEKEND I couldn't resist the sale at Lori Whitlock and purchased an SVG Christmas Dog Pop Up Box card, if you know me you know I can't resist making 3-D cards.  After downloading the file to my SIL I wanted to use my own creative touch for the card.  Whenever I am creating one of these styles of card I prefer the print and cut method versus the cut layers of colored paper....it just has a more finished look to me - so I made some changes to the dog, tree, and gift that were a part of the file.  To the dog I added a little pink tongue, I decorated the tree with some bones and snowflakes, and the gift was totally changed using a gift die from another Lori Whitlock file I own.......I also used the holly from that file in place of the snowflakes in the SVG I purchased.

To the hat of the dog I applied Ranger Stickles....and the ears and tail of the dog have Black Wink of Stella, while the white snow glistens with sparkly clear Wink of Stella (hard to see in the photos)  Additionally, I used some Diamond Glaze on the eyes and nose of the puppy....it makes them just stand out nicely.   

This card is just to stinkin' cute - While I had great fun coloring and inking up my stamps last weekend, this weekend creating a few 3-D cards was just crazy fun - I love to play on my Silhouette Cameo.   I can't wait until Christmas to get this little fella in the mail.  Thanks for stopping by!  

My card with all the changes I made.


This is the original design that came with my purchase


Materials:  Lori Whitlock SVG File, 100 Lb Card Stock, Wink of Stella, Ranger Stickles, Silhouette Cameo

Challenges:   C.R.A.F.T. Challenge Anything Goes, Give a Crafter A Cookie (inspired by cookie),  Send A Smile 4 Kids Challenge

Tuesday, March 28, 2017

Coffee....


Yep - another Z-fold card.  I was stalking people on blogger and came across The Verve Blog they were offering a free digi (how could I pass up a free digi).  They also suggested using the digi and posting it so I decided to try this little Lori Whitlock file using the sentiments from Verve, everybody needs an uplifting card in their stash......this turned out as cute as I expected it to turn out, I even added a little Wink of Stella to the froth on the two cuppas....


Materials:  Card Stock, Verve Digi, Lori Whitlock cut file, Silhouette Cameo

Challenges:  Verve Spread A Little Sunshine Challenge


Sunday, March 26, 2017

A Little Morning Jo


When you are checking out cards posted by people on FB and other places and come across a blog hop with the name Coffee Loving Cardmakers - how can you not immediately go and check them out.....and once you check them out you just have to make a card to join in the fun.

From the looks of Maude one can only hope her coffee kicks in so you can stay on her good side all day.  Maude is easy and quite fun to color, I inked her up to have a few extras on hand....I'm really fond of the darker robe and yellow slippers on one of the others, she has lots of options when it comes to robe and slipper colors.  


This background for this card was created on my Silhouette Cameo the image is Art Impressions "Golden Oldie Maude" - I can so relate to Maude most mornings before my coffee.  She is colored with Copic markers and then layered onto a card background.  A pretty easy card with an image that made me giggle as I colored her.....Maude may have to go on a few more cards - I'm thinking her next sentiment will be "A Coffee A Day Keeps the Grumpy Away"...although looking at her that is rather hard to believe.


Materials:  Card Stock, Silhouette Cameo, Copic Markers, Art Impression Stamp
Challenges:  Coffee Loving Cardmakers Spring Blog Hop, Jo's Scrap Shack Anything Goes

Thursday, March 23, 2017

Creating on my Silhouette

This last week Lori Whitlock cut files were on sale both at the Silhouette store and at Lori's store. A few of these files were just too cute to pass up.


Three are Z-fold style cards and the Giraffe card is a Center Box Card style.  While I could use my Silhouette to cut layers of colored paper to create the embellishments in the files, I prefer to manipulate the file into a print and cut with a white border - I think it gives the scenes a cleaner crisper look.  It takes a few minutes to do this but that means I can ALSO change the color of the design.  In the case of the golf cart I not only changed the color but added a few lines to give the cart a more defined top, and the look of a bumper and steering wheel....I also added some circles to make the tires look less color bookish. When it came to creating the giraffe card I kept things pretty close to Lori's version, but I love that in the future I can make this card with a pink, blue or green giraffe and personalize it.  All of these cut files  were great fun to create and play with. 

No real changes to the Christmas card other than adding gold behind the stars and the sentiment.  I created a second Bethlehem scene with yellow in the windows but it didn't quite look right in this layout with the gold.


Love this little giraffe - can't wait to make a pink one.  Used a little Wink of Stella on the moon to make it shimmer. 


Hmmm, there is a golfer in my life wonder if this card is in his future.


This bicycle card was scored using my Scor-Pal - score lines on the SIL are dashes and while it is easy to let the machine make the dashes and fold I often prefer a cleaner look and will score my cards myself foregoing the machine.  If you look close you can see the dashes on the golf card and giraffe card NO dashes on the bicycle card or the Christmas card.  

I love my Silhouette Cameo - there are soo many things I can do with it from creating the above cards to using it to create bases, make my own designs, print special sentiments in my cards, as well as importing photos or digis to use and color.....and then there's cutting vinyl.....that's a whole different post.   


Materials:  Silhouette Cameo, Card Stock, Glue, pop dots, scor-Pal, Wink of Stella
Challenges:  Scor-Pal Anything Goes, CardzTV Anything Goes, Word Art Wednesday Anything Goes


Saturday, March 18, 2017

Romping Bunnies

Follow my blog with Bloglovin


As I perused Splitcoast Stampers last week this card from Kittie747 caught my eye.  Over the years I have followed (stalked) Kittie - her work is so detailed, creative and outstanding.  After seeing her card I had to dig out my new bunny dies and get to work.  The frame is my favorite Spellbinders Floral Die that I layered with pop up for dimension.  My greenery is from an old but well used Martha Stewart punch (I am however going to buy the new IO foliage die I recently discovered).....the little flowers are an ancient small hand punch that I have had for at least 10 years.   


These adorable little bunnies are Cottage Cutz dies that I ran thru my cutter using beige card stock then I used some Ranger Distress ink and a sponge to color around them.  I dug out my smallest circle hand punch and gave these cuties an eye - using a larger circle hand punch I cut a piece of brown paper and layered it under the first cut - a little extra work but I wanted them to be precise looking.   Compared to Kittie I kept this card pretty simple but I am pleased with the results and cant' wait to put it in the mail for Easter.

Thanks for stopping by

Materials:  Spellbinders, MS punch, Card stock, Ranger Ink, Cottage Cutz Die

Sunday, March 12, 2017

Easter 3-D card

This card is totally different than the idea I was playing with a few weeks ago. I made two cards, the first I played with many months ago, putting it away to finish at a future date, which turned out to be today.  It is a cut file I purchased from Lori Whitlock, but I altered the background to fit my idea, this card has a layered look that folds down flat to send (see photo below).  On the second card  I used a digital image I purchased from a tattoo artist Hassified at Deviant art, it is a stunning image and colors up beautifully. 


 My first thoughts were to use the image on a 3-D style pop up card, but I just wasn't pleased with how the image looked on that layout, no matter how much I played with the placement, over and over again, it just didn't work.   As I started to look at the two cards near each other it became obvious the colored imaged was meant to go in the layout below.  


While this card will fold down flat, I decided to create a box to hold it as it will be hand delivered.  As much as I like the white cross the stunning image of Christ crucified will be the the one I use on this Easter card to show the great gift of love and grace that took place that first Easter.   


I couldn't have created this without the use of my Silhouette Cameo and Copic markers - both items I love to play with.  The digital image was imported to my SIL which I used to print the image to size and cut it out with my machine.  The SIL was also used to cut all the pieces used, including the box I made. Thanks for stopping by.


Materials:  Card Stock, Silhouette Cameo, Digital image, Copic Markers, glue


Friday, March 3, 2017

Third time is a charm....


     Back in 2008 a few years before my Blogging journey began I was ecstatic and grateful to have a converted over sized closet in the basement to stamp and create cards in - I added counter tops during a remodel to the old basement, then I purchased storage containers and utilized the shelves in the room and went to town stamping, coloring, gluing ...it was little but I had fun.
     Then in 2011 my husbands company moved us to the Atlanta area - all my stamps, inks, papers, pens and computer all got boxed up and moved.  My sweet husband made having a room for my crafting a must have on our house hunting list.  Once again I had the privilege of creating a new craft area.......I built bases for the addition of counter tops, painted some old file cabinets, built and created a stamp storage area - and several months after the move I was once again creating cards and playing with inks.  Then vinyl came along and a new Silhouette Cameo - all in my little corner of the basement, I pinched myself I felt so blessed and lucky.
     The job market changed and my husbands position was eliminated, he began the search, was offered a position and spent 18 months commuting to the suburbs of Chicago for work before we bit the bullet and made the decision to move.   December 2016 found us packing once again, and bless my husband, he put having a room to craft in as one of the items we needed in our Illinois home.  Knowing I would be creating another craft area I started saving money to put towards getting what I really wanted this time around, as if one ever really knows what they want.
      I knew this room would serve a multi purpose and be not only for crafting but for journaling and personal bible study.   I was able to search the hardware stores and find some cabinets and counter tops, as well as someone to install them (that is a story in and of itself and for a glass of wine and another day)  Again, I built a base for a desk to have a counter top installed on (I wanted it in the center of the room so I could craft with my sister now that we lived near each other)  - I scoured Pinterest and Ikea for ideas.....finally this week it has all come together. Nothing like moving into a house on December 6 unpacking, shopping for AND wrapping Christmas gifts, unpacking box after box to get things put away........THEN still finding time to coordinate cabinets and a zillion other details for the house and my craft room - I had to take time each day to be grateful and breathe deeply.
     Below are some pics showing the finished product with my desk. cabinets (glorious and wonderful cabinets to store things in).....and lots of little Ikea shelves put together and meticulously hung.  There is a small closet with LOTS of those sweet IKEA shelves holding my ribbon collection - (Don't judge me I may or may not have a ribbon hoarding problem LOL).  There is even a chair in the corner where I can sit and have coffee as I watch you tube videos on techniques or read my devotionals and journal, I truly feel grateful and blessed!  This is the third room I have created and its the last as far as I'm concerned.

Sitting in my chair with my feet up. The shelves helves and buckets in frames holding some supplies are from IKEA and the frames are from Hobby Lobby. 


Looking toward the door and my ribbon closet - the counter tops on the desk base I built matches the ones on the cabinets I had installed.  

My $3.99 IKEA shelves are holding my rolls of tibbon - there is also ribbon in some of the storage boxes, and yes there is even ribbon hanging - I do love my ribbon. This is a small closet but I have utilized every inch of it. 

I guarantee this desk will not look this clean in a few days. 


These are my embellishments in individual containers and labeled by style


     Thanks for stopping by - hope to post some of the cards and things I make now that I have my stuff out of boxes and can function.


01 09 10