Showing posts with label Copics. Show all posts

Saturday, September 9, 2017

Recycling...

If you don't own any Bugaboo stamps you should.....some of their characters just make me laugh out loud.  This sassy character is JJ and what fun it was to ink her up and color her.  I used my Copic markers and when I was finished with the coloring I added a little touch of Wink of Stella Clear to the balloons, drink and her accessories for a subtle bling look (doesn't really show up in the picture but looks pretty cool IRL).  After cutting some red and yellow card stock I mounted her onto my card.
This is a digital stamp and includes all but the words Happy Birthday - I added those and the red line separating the image from the words using my favorite machine my Silhouette Cameo.  She was busy enough that I didn't think she needed to have any of the elements cut out and layered -so I kept it simple.  Keeping it simple is not always easy for me as I love look of layers and embellies.   I'm going to put her in a few challenges and then decide who she goes in the mail to as a Birthday Card.


Materials:  Copic Markers, Bugaboo Digital JJ, Silhouette Cameo, Card Stock

Challenges:  (PIN)spirational Challenge #198, The Ribbon Girl September Challenge Anything Goes,
If You Give A Crafter A Cookie Photo Inspiration,  AUD Sentiments Challenge Blog Anything Goes + a Sentiment, Creative Knockouts #21 Something to Say

Tuesday, August 12, 2014

Bwahahah on your Birthdeay

     Yes, another Exploding Box card - I love making these!!!  Some people walk through the craft store looking for paper - I walk through the craft stores and my head explodes with ideas for these boxes.
     I know some people born on Halloween and thought this would be a fun card idea.  The skull is actually sitting on a spring type topper - LOL - I got the spring  from a Christmas decoration I picked up for another exploding box card that I took apart to use the pieces and the spring was left over - can we say re-purpose!!! Waste not want not.
     The headstone and coffin are digital stamps from Tiddly Inks - she has the most adorable images. These were intended to be used with her cute little witch, but they worked perfectly here.
     I couldn't help myself with the lid - the hand looking like bones was the perfect topper.  This one is going in my Etsy Shop - already working on a Christmas one, then I need to stock a few more cakes - it is such fun to be busy creating.
    The sentiment in the card reads (starting on the top panel) "It would be a grave mistake - not not wish you Happy Birthday"
     Thanks for stopping by to look.  Of course it goes without saying that I used my Silhouette Cameo to produce many of the pieces for this, including the sentiments with the digital stamps on them.

Materials:  Silhouette Cameo, card stock, embellishments from Michaels, Googly eyes, Tiddly Ink Digital Stamps, Copic Markers, Recollections embellishments. 

Friday, June 20, 2014

Age is just a number.....

      Had lunch with a friend yesterday and we stopped by my fave stamp store afterwards Impressive Ideas in Roswell Georgia. They were unpacking a new shipment of pull out pop up stationary and I just had to have some.  Ideas for this card are just exploding in my head right now so it was difficult to sit and decide just exactly what I wanted to do first.  I used my Silhouette Cameo to cut the border and then grabbed a Mo Manning image I had laying in my work area - I didn't want to over think the card so I went with what was within reach.  After coloring this sweet old couple with my Copic markers (you can see just a few of the markers laying next to the card that went into coloring this image).  I used my Silhouette to create a sentiment.  The overall look of this card is pretty clean an simple, at least for me,  You will certainly see more being created in the near future.

Materials:  Pre cut pull out card, Copic markers, Silhouette Cameo, Mo's Digital Pencil image, Designer Paper, Embellishments

Tuesday, June 10, 2014

Bring on the GLASSES!!


    Needed a card for my shop and a friends birthday - once I started coloring and cutting it only made sense to make two cards.  Once again I have used Celeste from Art Impression and some clip art to embellish around her.  This is a pop up card, the inner layer for the pop up was created on my Silhouette Cameo. Using the Cameo allowed me to put the black border around the inside layer as well as be sure my cuts were straight.  I also chose to type out the sentiment from AI to be able to size it to my liking.


     Celeste was fussy cut by me after I colored her with my Copic markers.  I had originally thought I would make her hot pink, but thought red suited the card more.  Once again I added not only wine glasses but frames for eye glasses.  My girlfriend is always digging for hers when we go to lunch and this will be perfect for her.


       The front is fairly simple allowing the inside to be the surprise.  While my friend loves my Explosion Box cards she is a year shy of a milestone birthday next year so I am waiting to make her one for that birthday.

Materials:  Art Impression Stamp, Copic Markers, Silhouette Cameo, clip art 


Sunday, April 13, 2014

Glasses, glasses - where are my glasses.


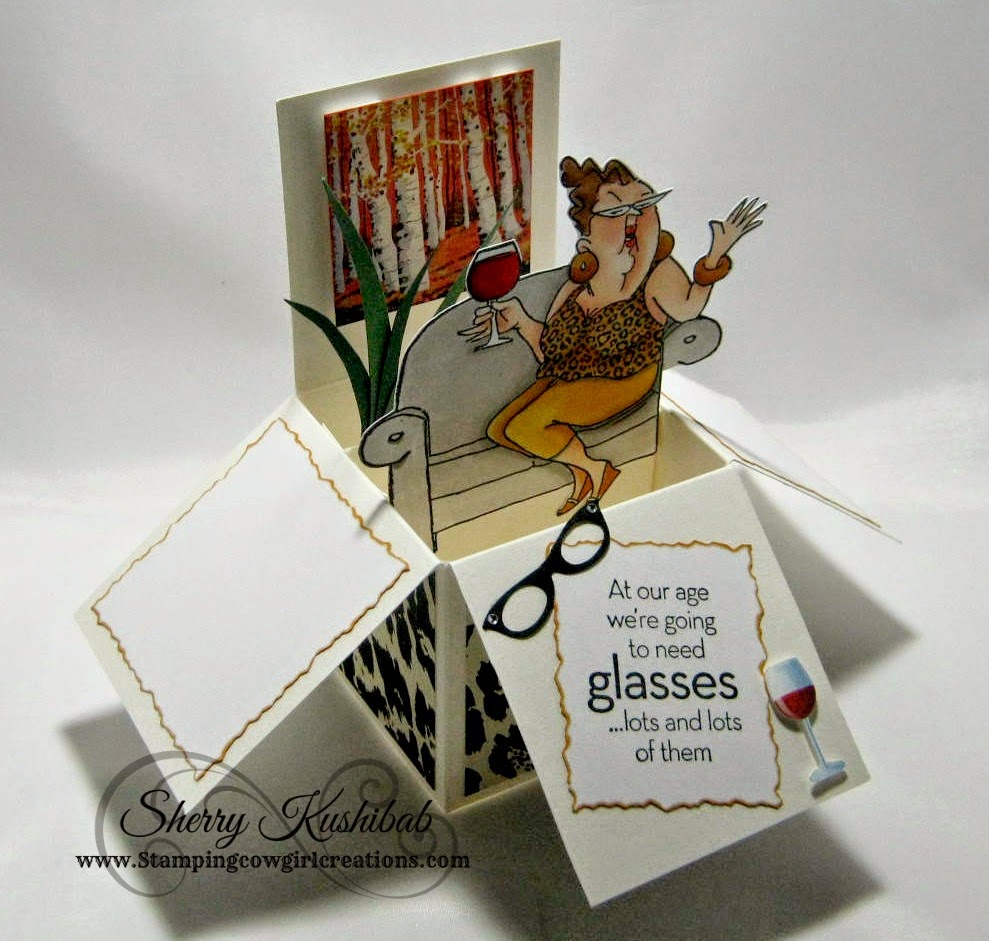
   Recently I took some time to create a pop up box card, not to be confused with my Explosion Box cards, this style of pop up card has become quite popular after a tutorial on Splitcoast Stampers HERE.  While I love the ones using flowers, and I am sure to make some like that, this particular day I was driven to use an AI stamp I purchased last fall that has never been inked up.  These cards are nice and you can put a lot of layers together, but proportion is key, in my opinion.  I just couldn't see how this stamp would work but I was determined to try.  Playing around I discovered that if I cut part of the couch arm out this sassy little lady fit wonderfully.  It became obvious to me as I played with this and the sentiment that came with her that I needed to make this card for Jill Saur, my art instructor, she is always switching her glasses to look at various pieces that students are working on.  To make the card even more personal I went to her website and copied a piece of her artwork (scaled way down) to use in the background.  She paints stunning scenes with birch trees, as well as many other lovely pieces. Since she shares her talent for art and teaching with me I wanted to share some of my card making talent with her - I think she enjoyed her card.
 Yes, you read correctly I am taking art classes.   I am at the age that one realizes they are getting older.....don't get me wrong I still adhere to that old adage 'growing up is inevitable, growing up is optional'.  However, this year is a milestone birthday for me...as I will be turning 60.  No matter what they say 60 isn't really the new 50 - it is 60!!!  Needless to say I have been pondering this event since my last birthday, reflecting so to speak......where have the years gone, how do I feel about things I have accomplished or not accomplished.....and what do I want to do as I grow up. There is no bucket list, but there are some things that I have always thought might be fun to try or learn and I recently gave myself permission to try one of those things - the aforementioned art class.  After thinking about it for more than a year I got in touch with a local Artist/Teacher Jill Saur in my area and was able to find a place in one of her classes.  This week was my fourth class and I am so happy with my decision to take this risk and develop this new skill. There are some lovely people in class......I have enjoyed the other students and Jill. The two and half hours fly by each week.
 

Supplies:  Cardstock, Art Impression's Celeste Set, Clipart, Silhouette Cameo die cut, Copic Markers, 


Saturday, March 29, 2014

Coloring and cutting......

     Yep, there is a little coloring and cutting going on in the stamp room today.  I'm in need of some more Easter cards.  My go to stamp is from Flourishes, who sadly is no longer in business.  This cross with Easter Lily's was designed by Marcella Hawley - You may not be aware of this but she has opened  her own on line stamp shop this week called  Power Poppy (please check it out she has put together an outstanding design team)  If her new designs are anything like this one I am gonna be one thrilled stamper.
     Two of these beauties above will be going into my Easter Exploding Boxes that I sell and make for friends.....and some will be going in a pop up style card I have designed.  I usually cut out the center flower from a second stamping and after a little bending and folding layer it over the one on the cross for some dimension.  I will also be digging out a rock stamp I have to layer in the pop up card as well.
     I would have taken a picture showing more but then you would know what a mess I create when I am coloring and cutting.

Materials:  Silhouette Cameo, Flourishes stamp, Copic Markers, Card Stock

Sunday, March 16, 2014

Easter Chick....


     The last week and today has found me working on several Easter cards.....this little chick is a stamp I purchased last year. My first thought was to stamp it, color it, layer it on a die and put some bright busy paper in the background......but I instead decided on a more clean and simple look (If you know me then you know that clean and simple does not usually describe my style at all).
    Using my Silhouette Studios text feature I typed the word happy and merged it with a rectangle.  The word Easter was typed and the cut feature turned off to print the word instead.  I also did an internal offset to create a golden yellow line around my word and shape to coordinate with the background paper I decided to use.  After printing and cutting I stamped my little chick next to the word Easter and with my Copic markers colored him in.
     I like the yellow polka dot paper and how it coordinates with the little chick....definitely the kind of card that brings a smile to my face when I am finished.  Patting myself on the back for keeping it simple as well.
   

Materials:  Silhouette Cameo, Crafts Mart Stamp, Copic Markers, Designer paper, Brilliance card stock

Challenges:  Featured Stamper gallery for Yours Truly at Splitcoast Stampers 3/16/14

Wednesday, December 18, 2013

Exploding Barn

     My daughter and I made our yearly trek to the White Stallion Ranch to do some horseback riding.  There are about 18 of us who meet there each December from all over the US and world (England, Germany, Channel Islands, Minnesota, California, New Jersey, D.C. Tennessee - we adopted a visiting Australian this year as well). Every year we celebrate the birthday of a lovely lady named TJ.  This year we knew we would be celebrating number 75 with her.  Such a birthday called for a special card.  Months ago I began dreaming the idea up in my head for an explosion box card AND FINALLY just before Thanksgiving I had time to sit and play.
     With the help of my Silhouette Cameo I was able to design a cake (my own design) and a barn style cover for the box (again my own design).  The barn door is a cut file designed by Cali Arroyo, and the cactus and wheel are a cut file design by Jamie Cripps.   The sweet horse on top of the cake and peeking out the window is a digital stamp from Clear Dollar Stamps.   
     After designing this cake and frosting on my Silhouette Cameo.... I decorated it with a personalized message for TJ!!  Every cowgirl needs some 'bling' and TJ's is on her cake - since the whole theme was barn oriented I placed the cake on some hay!  
     I couldn't carry the card around the ranch and get signatures on the sly (given its size) so I created individual cards that I could slide out of the fences and carry around with a pen in a zip lock bag.  This allowed me to get lots of good wishes for her on both sides of the inserts.  

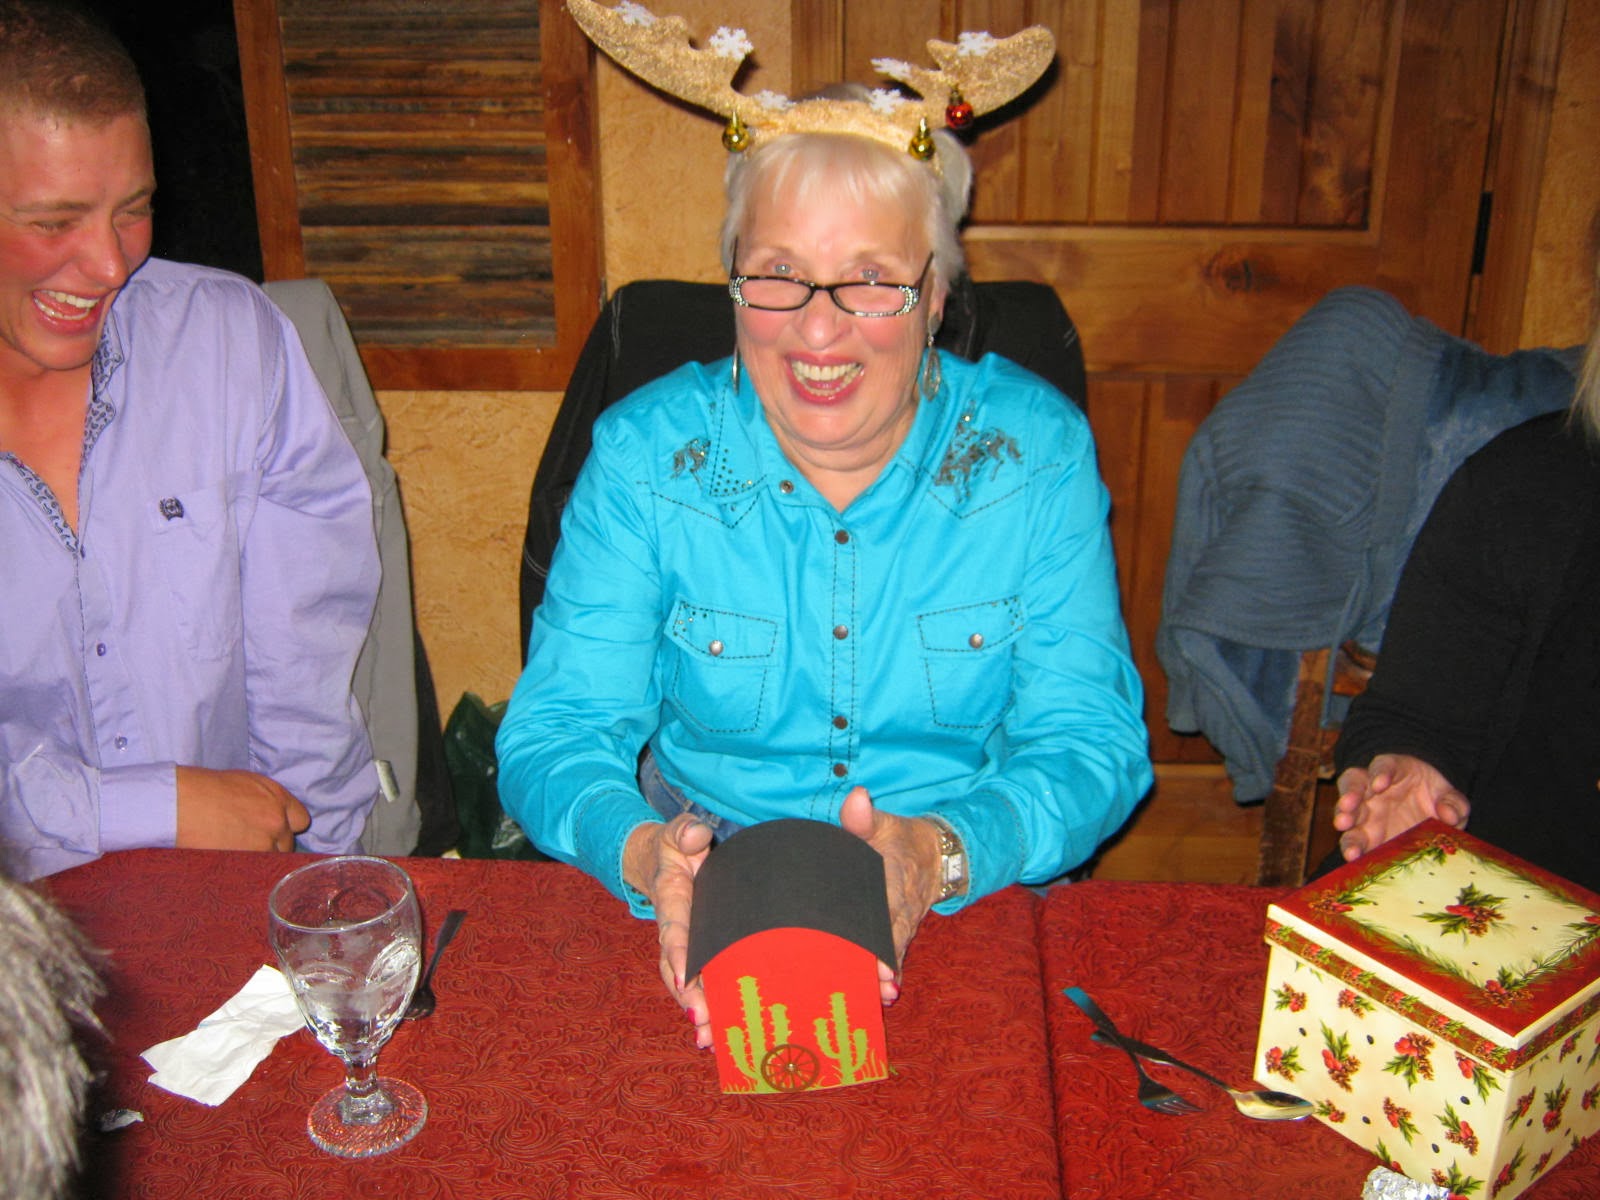
     Below is TJ getting ready to open her explosion box card - she was so excited by all the people who left her messages and Birthday wishes and she is ALWAYS so complimentary about the cards I make her....this one was a huge surprise to her.  


     It was great fun making a card like this for such a special lady.....BTW she is wearing antlers because I couldn't find a tiara at the grocery store in Marana and holiday antlers were as close as I could come.  She is a great sport.  

     Going to post this on the Silhouette challenge this month for 3-D  --  I love making 3-D cards and using my Silhouette has made them even more fun. I am posting this over at the Silhouette Challenge for 3-d and anything but a card for December - think about joining in on the fun.  

Supplies:  Silhouette Cameo, Rhinestones, Embellishments, Memory Box  fence, Clear Dollar Digital Stamp, Copic markers


Challenges:  Silhouette #8 3D

Saturday, October 19, 2013

Santa nestled in the greenery

    Months ago I saw a card on Pinterest that fascinated and inspired me.  I had only recently purchased the Spellbinders Ornament die, but realized the shape of the card was nothing close to what I owned.  So the picture was filed away until recently when I decided I would just have to make my own background to replace die used in my inspiration piece.  Why own a Silhouette Cameo if you can't get creative.

     I designed my own shape for the easel background and then started playing.....I am in love with this sweet half moon Santa from Sassy Cheryl and I thought he would look great.  However, he just looked SO plain sitting on the ornament - next thing you know I drew upon my inner Kiitie Caracciola  (oooh I love her work - you can check out her gallery here) and out came the Martha Stewart punch, some snowflake dies, blinginty bling and soon Santa was nestled amongst the greenery with snowflakes falling.  I do have to admit that at one point I had to tell myself 'step away from the bling' as I was afraid I might be getting to carried away.  Below I have posted the inspiration image and a second card I made using this same easel background I created and the Spellbinders Ornament die.....it amazes me how changing things like paper, and images can make three very similar cards look so different.

This is the inspiration piece, now watermark can't remember who did it, but they are talented. 

This is my second card using the shapes from my first one at the top of the page. 
     Just love how both of my cards turned out - beginning to look a lot like Christmas around here.  I have about 13 ornaments painted and finished and ready to go.  Thanks for looking. 

Materials:  Silhouette Cameo, Spellbinders Ornament Die, Bling, Martha Stewart Punch, Designed2 Delight Digital, Sassy Cheryl Digital, Designer Cardstock, Copic Markers, IO Snowflake Die

Challenges:  Just myself :)

Wednesday, October 16, 2013

Get Well

     This card is for a Bella, she has been diagnosed with Acute Lymphoblastic Leukemia (only a few short months after her cousin Bridger received a more severe and aggressive cancer diagnosis).  The Teapotters over at Splitcoast have challenged us to make Isabella some cards to cheer her up.  I am late getting to the Tea Party.....which is rather ironic as I knew of Isabella's diagnosis and need for cards two weeks ago and made this card.  I'm just way behind in getting it to the post office.  The Teapotters will probably be making princess cards, I made this before the challenge, but I personalized it so Isabella would feel special.  You can read about Isabella here.  This card will get to the post office in the next two days and I am continuing to keep Isabella, her family and her cousin Bridger in my prayers......these kids are too young to have to go through all these treatments, breaks my heart.  What troopers they are.

Materials:  Old Bear Stamp, Silhouette Cameo for Letters, Ribbon, Cardstock, Spellbinders die, Copic markers

Challenges:  MMTPT272

Friday, September 27, 2013

Lil Buckaroo..........

     A friend at Splitcoaststampers challenged a few of us to some Jammer Town fun this weekend using a 'Western Theme'.  I can't resist a western challenge so I put aside the pieces I have been designing on my Silhouette and took a break to make this card.  I got out my Little Buckaroo stamp from Sutter and a lovely background stamp by CC Rubber Stamps.  After stamping my buckaroo I masked him with to stamp over the image with the background stamp so he would look like he is standing in the field.  Colored him with my Copics and dug out some recently purchased 6x6 burlap that is paper backed.  Ran it through my Grand Calibur with a Spellbinders square die and then created a frame using to of the dies.  A simple but fun card.  I have been working hard designing my own cut files with my Silhouette and it was great fun to take a little time to make a card.  Thanks Greenie (aka Sue).

Supplies:  Lil Buckaroo by Sutter, CC Rubber Stamp, 6x6 paper backed burlap, Copics, Twine, Horseshoe charm, Spellbinders


Friday, July 26, 2013

Hush little baby don't you cry.....

     You have no idea IRL how adorable this little fella looks.  When I discovered that Bambino from Sugar Nellie was available as a digital, I swear I swooned!!  This is an image I have coveted for sometime, to be able to own it as a digi - well I could hardly contain my excitement.
    Upon discovering this image I immediately purchased and downloaded it - before printing I adjusted my print settings to print in a light grey ink.  When coloring an image like this, one would like to take credit for the beauty of it, but the image is so wonderfully drawn that, using my Copics, it took very little talent on my part to bring him to life.
    I must confess that the background was made using my Silhouette Cameo with a pattern from Lori Whitlock, and was sitting on my desk from a few weeks ago (since it was blue that is what determined this little cutie would be a boy).  The card was originally going to be used for a birthday card that I later decided I wanted bigger - so I resized the pattern on the Cameo and made another step card to use.  I sat this on the shelf waiting for future use.  Waste not, want not.
     Honestly, I am so crazy about this image I had trouble even wanting to put anything around him.  Digging into my stash of embellishments I came across these sweet little buttons that have been waiting a LONG time to be used, then I settled on a small sentiment from an old Fiskars Baby set.
     This card will be thrown into the challenge at Use It Tuesday where they challenge you to use what you have.  I also meet the challenge at Creative Inspirations for their Bingo call using Ribbon, Sentiment, and Buttons from the first row of their challenge - used them all in a row on my card as well :)
     Now I hope someone has a little boy soon so I can put him in the mail!!

Supplies:  Digital Image Sugar Nellie, Ribbon, Buttons, Fiskar Stamp, Spellbinders dies, Silhouette Cameo, Lori Whitlock Pattern for Silhouette, Cardstock, Copics

Challenges:  Use It Tuesday #60,  A.R.T #7, Craft Den #97, Fussy & Fancy #94 More than one fold,  Creative Inspirations #224 Bingo

Sunday, July 21, 2013

King of the Jungle

   Had a little fun joining in on the Inspiration Challenge at Splitcoaststampers from yesterday (IC398).  After finding a lion charm at Persona for my inspiration I quickly decided to try out this 3-D lion card from Robert Subuda.  Once again I put my Silhouette to work.  After downloading the design from the web, I scanned it and loaded it into my Silhouette for cutting.  To save on some coloring time I cut this from some colored cardstock and then used my Copics to color some of the areas for highlighting.  He is just too cute and has been fun to open and close - keeps me giggling. He is going to be a Birthday card......I got a little carried away with the background layers he is on......may have to pay a little extra postage, but sure worth it.

Supplies:  Silhouette Cameo, Copics, Cardstock, Glue, Robert Subuda pattern


Monday, July 8, 2013

Thank you.....

     Oh yeah, can we just say AGAIN......I am lovin' my Silhouette Cameo.  While playing with my Silhouette today (there is sooooo much to learn) I came across a blog where they have monthly challenges using the Silhouette.  This was just the opportunity I needed to push myself to try something new - faux stitching with my Cameo.  While I have watched many tutorials and knew that I could print and cut, I really didn't fully understand what I could really do with this baby.  Today I drew my own rectangle, filled it with my color choice, did some other fancy schmancy button clicking to add some stitching and made my card background.  Of course the proportions are all to scale since I also cut the dark brown after tracing my original drawing.  Then I loaded a tag that came with my machine, choose a coordinating color to my background and poured it in, did some more fancy schmancy button clicking and created some more faux stitching and then sent this to the printer for printing, loaded it into my Silhouette and cut.  I have to take credit for fussy cutting the boots after I stamped and colored them (Stampin Up can be a little fussy about digitally reproducing their images).  The boots were placed on pop up foam and placed over an image stamped on the card so I wouldn't lose the shadowing of the original stamped image.  Some words were added with a stamp to my tag and my card was finished.
     No it is not a real fancy card......but I am just thrilled with the print and cut option and LOVE the faux stitching affect......I know I will use this more.  Entering this in the challenge at Silhouette Challenges.  

Supplies:  Silhouette Cameo, Stampin Up Wild West, Pop ups, White and Brown Cardstock, Copics

Challenges:  Silhouette Cameo - Faux Stitching, 

Friday, July 5, 2013

Happy Birthday

     I just wish to say that I LOVE my Silhouette Cameo - while I have only owned it a few months, and have nary a clue as to what it will really do, what I have been able to accomplish has sure made my life easier.
     My SIL will be turning 50 this month and I wanted to get a card made for her.  I've known her since she was 15 and I began dating her brother...she was a maid of honor in our wedding 33 years ago.  While it was tempting to make one of those real 'Oh my your over the hill' cards, I decided to use Art Impressions oh so cheerful bird, cough, cough......but more importantly I wanted to make a step card.
     While I have patterns for step cards I decided to use my Silhouette to make this one.  Oh my, how easy peasy.  I had purchased the cut file for this step card and decided to re-size it to a 5.5 x 5.5 card.  The file also contains the cuts for the side pieces as well as a circle and scallop.  It was oh so easy to re-size the layered pieces right on my machine.  Layers on my step cards have always been a challenge to me, it may be easier for others, but certainly not for me.  This machine made them a piece of cake - ALL proportioned the way they should be.  I did fussy cut my image after I colored him with my Copics - I hadn't at that point decided exactly how this card was going to be put together when I inked him up.
     Then I did a 'first' for me - I used the cut pieces in my file and manipulated them to make this inside cut that wasn't included with my purchase (imagine me grinning ear to ear in pride for this small accomplishment)!    Of course, I was also able to make, with a few clicks on my computer, the outer layer as well.  Before actually cutting this I typed my sentiment, scanned it, then placed it in my cut file, sent it all to the printer, then loaded my printed copy into my Silhouette and BAM a lovely layer for the inside of my card.
     Can I just say life is good!!  My file is now saved and when I decide to make another step card I just have to click, open, cut, and assemble.  Time to get this card ready for the mail.

Supplies:  Art Impression Stamp, Copics, Silhouette Cameo, Computer, Cardstock, scissors

Challenges:  Fab'n'Funky #178 Anything but a square, Word Art Wednesday 87 Anything Goes, Splitcoaststampers, F4A176


Wednesday, June 19, 2013

Love & Happiness.....

     I saw this layout and design posted on Pinterest by Jo Ham of Its My Creative World.  Can I just say she is one creative lady.  You may have noticed from several of my posts recently I have been making wedding cards for some friends.  It was while wandering through Pinterest one evening that I came across this beauty.  I CASED her work, changing the coloring some, I also changed  the sentiment and die it was printed on, and instead of  using a flower I chose some different embellies.   Jo designed this half round step card for use with a Silhouette, I just had to download it and try it on mine -- I love step cards and just couldn't pass up this great shape.
     There is a learning curve on the Silhouette and on this card I learned several lessons I thought I would share.  First, Jo said in her blog that after cutting and folding you would have to cut the excess outside edge, no problem.  My little experience with Silhouette has taught me that the dashed lines for folding can get a little worn and sometimes tear easily if you are too rough - it took me two tries on this card to get it the way I wanted it.  What I learned was that right after cutting those excess edges, take the time to then adhere the background while it is laying flat.  Playing around too much with my first one caused some stress on the fold lines. I also discovered that the pieces she included in the cut file for the background weren't really to size - while they fit the main circle, the edges of those change after you hand cut it......I am going to play around and see if I can change her pattern and save it.
     The image is from Mo's Digital Pencil -- ya'll know how much I love Mo's designs).  The lovely couple was colored with my Copic Sketch Markers....I also used my Gelly Roll Clear Star pen to give some sparkle to her gown.  I ran my Cheery Lynn small flourish die through my Cuttlebug about 4 or 5 times to create the embellishment behind the couple, the white background was also run through the Cuttlebug with a Valentines embossing folder. After generating my sentiment on the computer I lined up my Opulent Oval die over it and cut it out adding a darling little Dove from Jolees.
     Know that I fell in love with this card and was obsessed all day putting it together.  Using my Silhouette is still very new to me - it can do so much and I know so little.  If it weren't for great tutorials by ladies like Jo, and others I have pinned, I would be at a loss - they inspire me to practice, practice, practice using this fine machine as a tool in my paper crafting world.


Materials:  Silhouette, Mo's Digital Pencil, Copic Sketch, Spellbinders, Jolees, Cheery Lynn, Cuttlebug, Gelly Roll

Challenges:  Word Art Wednesday - Anything Goes
  

Wednesday, June 5, 2013

Spring into summer

     I was working on this image before vacation, and feel like I need her finished up with Summer around the corner.  This image so reminds me of my bestie Vicki.  We are complete opposites and often laugh about it.  I am an early riser, she hates mornings - I am ultra conservative, she likes to pretend she can be, but is much more liberal than I am - she loves to relax in her garden, I do not have a green thumb and look for reasons not to grow things.  When I saw this image at Mo's Digital Pencil I just had to click 'buy' and add her to my collection.

      For my inspiration today I used the Sketch Challenge 439 over at SCS shown above.  I turned my card sideways and changed the shapes up a little.  There are days that challenges like this can be great inspiration when your trying to finish projects up.  The original design was somewhat similar, but I am glad I let the sketch inspire me.

Materials:  Mo's Digital Pencil Image and Sentiment, Cheery Lynn Flourish Die, Spellbinders Oval Die, Corner punch, MME Paper, Copic Sketch Markers, Ribbon


Tuesday, June 4, 2013

Ruh Roh ......

     Ruh Roh - Rocco is in the doghouse.  I am catching up with cards I need to make, while I was on vacation I missed a few birthdays.  Like "Rocco" I think I need to be in the doghouse for not being better organized.  I couldn't wait to color up this sweet little fella from Mo's Digital Pencil.....the fun was in deciding what markings to give him since this particular digi is mostly an outline, I love that belly I gave him, and who doesn't  love that 'oops - I think I'm in trouble' look he is sporting!   I found the tennis shoes in my clip art file and printed them up and fussy cut them out - Rocco is responsible for the piece missing from one of them, you can tell from the guilty look on his face as well as the tenny hanging from his mouth, tee hee.  For the front sentiment I dug out my Sizzix "Wingo Zingo' Alphabet - while I have owned it for quite some time - this is the first I have used it....it wasn't as dusty as I thought it would be :-)
     The sentiment on the inside says "I'm in the doghouse for missing your Birthday, Hope it was a good one"    What fun it is coloring Mo's images - next goal is to learn to merge some of her images together and layer them.  Need to get Photoshop and practice.....I have a few in my Mo's file that would look great together.

Supplies:  Copic Markers, Spellbinders Die, Sixxix Letters, Cardstock, Clip Art from Computer

Sunday, May 12, 2013

Lets Cook Up Some Fun

     I wanted to post this last night but was just plain tired after my usual workout, a bike ride and dinner with my hubby.   My Darling Husband has purchased a bike...he wanted to find an activity we could do together and he knows I enjoy biking (not heavy duty biking, but there are some nice trails nearby).  Yesterday when he came home from golf  he informed me we were biking.  Rain was predicted and I wasn't too sure about the big black cloud just outside, but he assured me it was NOT suppose to rain until much later.  Out we headed to check the tires, filled them, loaded the bikes and headed out.  Four miles into our ride it started to drizzle - argh - we quickly turned around and got back 12 minutes quicker than it took us to get the first 4 miles. The bikes were quickly loaded onto the back of my SUV and as the last strap was pulled the skies let loose with a deluge!!  We laughed pretty hard in the car....and I can only say that I am pretty sure that our rides together can only get better from here on out.
       Mo has a challenge this week to do a Clean and Simple card with one of her images.....tee hee.....one doesn't usually think clean and simple when playing with her images. The truth is this isn't exactly how I wanted this to turn out.  My original thought was to have these two darling images over lap, but no matter how many tutorials I followed it just wasn't gonna happen on THIS card (working on it for a later date, need a few hours to play).  Once I started playing I was gonna get er done, and this was the result.  Just felt she needed a little something and added the ribbon and utensils for some embellishment.  She is going in my stash.  I have a few days off this week and plan to spend some of that time looking through tutorials to see if I can learn to 'merge'!!

Supplies:  Mo's digital images, ribbon, DP, Copics, Embellihments I p/u from Hobby Lobby but lost the package :(

Challenges:  Challenge 184 Clean and Simple at Mo's Challenge Blog

Retro Fun

     The Featured Stamper at Splitcoaststampers this week is Silli - you can visit her gallery here.  She had posted a darling retro image on a card, that I first took note of several weeks ago. I have a few retro digis that I have been wanting to use and when I went through her gallery again today I thought what better card to CASE than hers to honor her as Featured Stamper. When I first purchased the patterned paper you see here I knew it was meant to have a retro image on it - how could it not - its called Happy Days!!  I used my Copics to give some color to the image, generated a saying for the front, and fussy cut around the cans from another sheet in the set.  I will be using this as a Birthday Card once I generate an appropriate saying for the inside.
     These retro images really are catchy - guess I'm getting old, this could be my mom in the kitchen when I was younger - I have a few more that are just as sweet and hope to get them on paper soon. Ya'll have a great day!!

Supplies:  Digi from Graphics Fairy, docrafts Happy Days Designerstax, computer, Spellbinders, Copics

Postede:  Splitcoaststampers FS337

01 09 10