
WARNING
Lots of pictures here since I don't own a video camera to film an explanation.
There are 3 tutorials as you scroll down.
1) 3-D Cake for Exploding Box Card
2) Folding Frame for a 3-D card
3) How I make my flowers (2 styles)
I hope you find them useful.
3-D Cake for Exploding Box Card

The directions are below each picture

Using the two largest dies from my Spellbinders Floral Doily Motif set I cut my frosting :)
I also chose a lighter brown for my base and cut a strip 1 inch by 10 inches
and another strip 1 inch by 6 inches (this pic doesn't show them both)

Before removing my paper from my die I take my stylus and go around the inside
of the die on a rubber mat, careful to not push too hard and tear the paper, but with enough
pressure to break down the fibers so I can fold along the mark I make.
I do this to the piece I have cut from each die.
You then remove your paper from the die
and turn the piece you have used the stylus on OVER and gently fold
it down.......

NEXT - between each decorative element you will make a small cut UP to
the fold. When you are done cutting, gently fold all the way around. You
now have the frosting to your cake.

Next take the piece you have cut 6 inches long and
mark 1/2 inch in on one side. Don't worry about it showing,
once you put the piece together and decorate your cake it doesn't show.
Put adhesive on your paper between the end (0) and the 1/2 inch mark.
Bring the other end around and adhere it to line
up with the mark you have made at 1/2 inch. NOTE: YOU ONLY
USE 1/2 INCH OF DOUBLE SIDED ADHESIVE HERE.
I have found that keeping the overlap short prevents the circle you
are creating from getting mis-shaped due to too much paper overlapping.

If you have done this correctly the circle you make will fit inside the circumference of the die you
used to cut the frosting. Take some good double sided adhesive tape and run it around the top of
the cylinder you have created. (Pictured on right)

Place your circle into your cutout die and gently begin to bring
the sides up that you have cut to touch the adhesive- this is what keeps
the die on your base and when you turn it over
looks like frosting.

Like the directions above you will now be creating the bottom layer of your cake.
Take the piece you have cut 10 inches and mark it in at 1/2 inch.
Apply your adhesive between the end and 1/2 inch mark
bring the end around and line it up with your 1/2 inch mark and create a 9-1/2 inch circle.

Just like your top layer, you will put adhesive all the way around your
circle. I put mine a little high, I recommend you keep it even so it doesn't stick
when you place the piece into your die cut piece.

Gently press every other flap of your die down....I think the finished product looks
better this way (you can do it anyway you want).

To adhere the top layer to the bottom layer I put double sided
tape inside the top piece. I don't remove the white paper or it just gets
messy......I fold it down to just above the paper line and CAREFULLY
lay it on the top of the piece pictured on the left. Do your best to
get it centered. If you can find an easier way to put this on top feel
free to let me know. It was the best I could come up with when I was making
this tutorial. I have yet to know how well it will hold up when I mail it,
but I am hopeful this will work fine.

You now have a two layer (in this case) chocolate cake to decorate.
Mmmmm chocolate is my favorite!!
For this particular cake I have run some ribbon through my Xyron and placed it
around the tops and bottoms of each layer of cake. I am now thinking I may add some flowers
and leaves. But that's what is nice about this project, you can decorate it any way you want. I can honestly say this project is not difficult.....now that I have the details recorded with measurements I don't think it will take me more than 20 minutes to get a cake together - its the details that will hold me up as
I try and decide just how to decorate each one personally.
I don't have any puff paint or I would have tried using some of it to see how it works.....I will save that idea for a future cake. Personalize your cake with a rub on initial - or a computer generated one like I used on the one I posted on my blog. The possibilities are endless, use your creative imagination. Have fun!!
I tried to cover all the details the best I could
*************************************************
Folding Frame for a 3-D Card

You will need two sheets of cardstock. Cut one piece 10 1/2 inches by 5 1/2 inches and score at the 5 inch mark. Cut a second piece of cardstock 11 inches by 5 1/2 inches and score at the 1/2, 5 1/2 and 6 inch mark.
Then using a die to cut a frame in the side that is between the 1/2 inch mark and the 5 1/2 inch mark.


With good double sided tape place one 5 inch side over the other 5 inch side - it should look like the picture above.

Place your stamped 3-D image in the center and BE SURE IT IS LINED UP BEHIND YOUR FRAME.

Place your double sided tape on the 1/2 inch side fold and bring the frame over your image. Attach it to the 5 1/2 inch piece, holding the side on the left up to match them evenly.


When you fold your card it will lay flat and fit into a 6 inch envelope and be only 5 1/2 wide. It may be a little thick due to the 3-D image on the inside.
To the left is the prototype I made, and below is the finished front I will be sending. This was not difficult and I am confident you can do this with these directions.

*******************************************
The first set of pictures has the directions for making the flowers rolled upward.....below this you will find some more pictures using another die and how I made those flowers rolled downward - they do look different. .
Flower 1
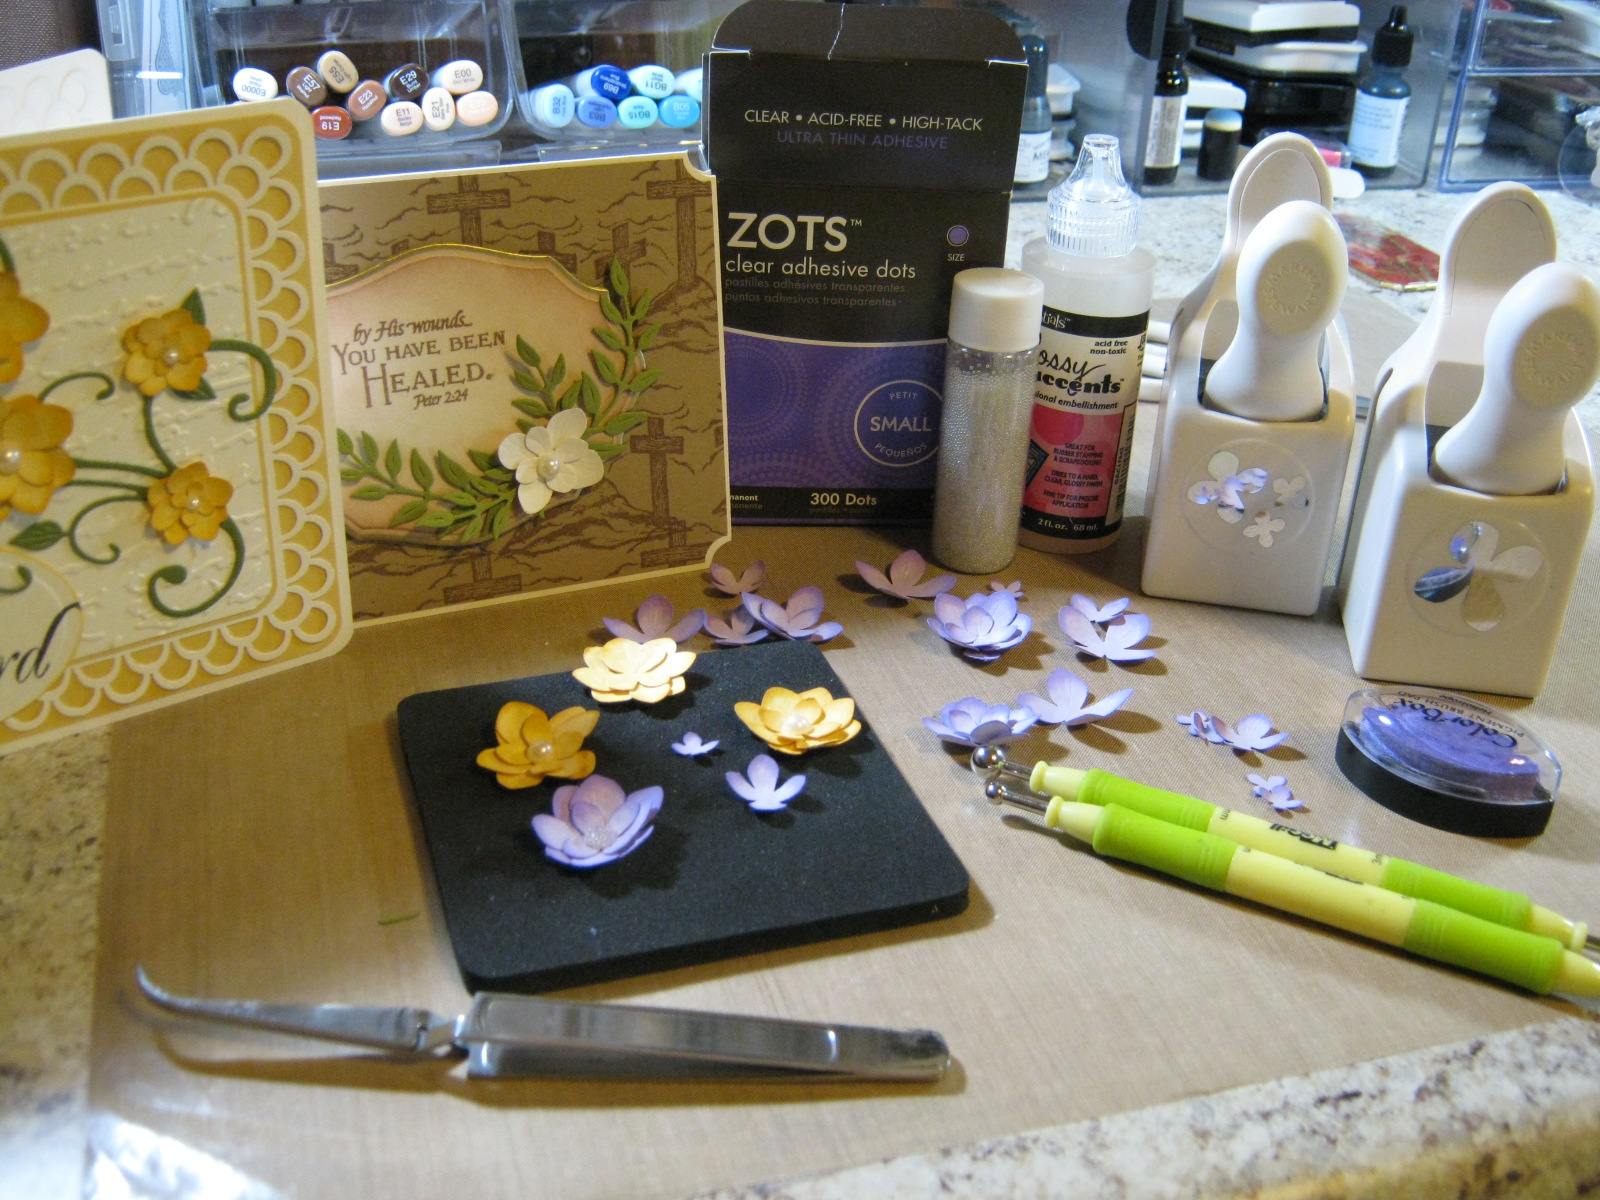
These are the basic supplies I used to make my flowers, Martha Stewart Hydrangea Punch, Martha Stewart 3 in 1 Hydrangea Punche, Ink, McGill Stylus, Zots, Glossy Accents, Glass Beads or Pearls,

After punching several sizes of flowers from both punches I used a small Color Box ink pad to slightly tint the edges of each flower in a color a few shades darker than my paper

With a 1mm stylus I drew veins on each petal of the flower

Then with the 5mm edge of the stylus I gently rolled each petal on my soft mat so that they rolled up towards the middle - it doesn't take much pressure and I stayed mainly on the out petals only without going into the center

This is how they look after I have used my stylus

Once you have decided how many petals you will use for each flower I applied a Zots dot to the back of one and placed it 'askew' over the first petal to create a little layered look

Then I took my 3mm stylus and pushed down into the middle of the flower

This particular flower is three petals, two of the same size, and one smaller, so I adhered another Zots dot to the smaller petal, and once again slightly 'askew' placed it on the other petal.

On the purple flower in the front I placed a large dot of Glossy Accents and then covered it with glass beads. You can see that I chose to use pearls for the center of the other flowers. This is all personal preference.
The yellow flower below uses two punched flowers from the MS Hydrangea punch, and one flower from the MS 3 in 1 Hydrangea punch.
 |
| For the white flower below I punched one flower from the MS Hydrangea punch. I then used the MS 3 in 1 Hydrangea punch and chose the largest flower to place on the first. |

I hope you have found this helpful. Flowers are an element I enjoy using on my cards and have always admired on others cards. I have learned this technique through the many blogs I have visited as well as stampers at Splitcoaststampers and thought I would share it.
Flower 2

For this flower I took a piece of DP and using a Memory Box Die ran it through my Grand Calibur. At this point you may choose to ink the edges of the flowers to highlight them, or leave them plain as I did for this demonstration.

I turned the cut flower over and used a McGill 5mm stylus to roll the edges so they turned up. This was done to all three sizes I cut.

You will then turn the flower over so the colored side of the DP is showing and with the other end of the stylus, gently push down in the center. Notice that the outside of the petals stays rounded and pop up from the center. You do this to all three flowers.

Then you can either use a drop of glue or a glue dot in the center of the largest flower, and place the next size flower on top. Add another small drop of glue or glue dot and place the third flower on top of the second. To finish these off you can add a pearl, rhinestone or small beads to the center, all personal preference.

The flower on the left is how this will look when you have completed the above steps. The flower on the right is how the flower in the instructions for Flower 1 looks in comparison. I wanted to get a shot from this angle to let you see the difference.

The flowers on the left, made from the Martha Stewart Hydrangea punch, shows one done in the style of the Flower 2 instructions and two done in the style of the Flower 1 instructions.
The flowers on the right are from the Memory Box die and are all made using the instructions shown for Flower 2.
I like both styles but have to admit that I lean towards style 2 a little more.
Mercy....let us have a moment of silence to take in the beauty this holds, paper wise, and most of all, heart wise. What a blessing to look upon! Lymi
ReplyDeleteHi Sherry, I love your creations, original and from the heart. Could you please help me? I'm looking for 2 stamps you used in a Christmas Card: Heartfelt Creations and Morning Star, where can I buy/order them??
ReplyDeleteThank you so very very much and I enjoy all you create. Anouk
oops, forgot my email: teddylady1@juno.com, hope really to hear from you. Blessings
ReplyDeleteWonderful post thanks so much for sharing your talents so we can learn.
ReplyDeleteShaz in Oz.x
{Calligraphy Cards - Shaz in Oz}