Showing posts with label computer. Show all posts

Monday, April 2, 2018

Easter - He is Risen


The idea for this card using a tomb background was in my head last year - I tried several layouts and finally put them away in a file....revisiting the idea again recently.  None had the impact I was looking to achieve for this stunning image.  At last I had a 'light bulb' moment and decided to use a "Z" fold card to be able to fit all the images I wanted this card to have. 
The image of Jesus on the cross is a digital stamp (that I have used several times) - it was colored in Copic markers and popped up on the front of the card.  The tomb was the real challenge, you just don't find tomb stamps on the market.   I used some other digital art that was basically the tomb entrance and embellished it with my fine point sharpie marker.  I had a small rock stamp that I used and scanned, flipping it to create the surrounding ground.
When the card is folded flat you do not see the tomb entrance- instead you see the cross and the rocky background - this conveys the Good Friday message I was hoping for.

When you open the card you see the full picture - Easter is so meaningful to me as a believer I really wanted a card with impact!  To me this portrays how death could not hold HIM.

Whenever I do this style of card I put my sentiment or message on the back - there is also a place on the separate small flap for my logo stamp - then it all folds down nicely to fit in an envelope.  I couldn't have done this card without my Silhouette Cameo to cut the panels and background.  I also imported the images and used it to cut them out.
I will admit this card took some work, mainly because I had an idea in my head and I knew I wasn't going to be happy until it became a reality.  This is exactly what I love about coloring and creating cards - the challenge of having the finished product look the way I saw it when I closed my eyes and imagined it.

Materials:  Digital image/stamp by Hassified, Copic Markers, Printer, Computer, Silhouette Cameo, card stock, Sharpie marker

Thursday, January 9, 2014

Vintage Valentine Pop Up


My inspiration for this card came from the original 1908 Valentine's card that was my grandmothers. Sacrilegious as it may sound I took the card apart and scanned it to use.  The truth is that while the card holds sentimental value to me I like knowing that is being re-purposed, so to speak, being used in a new card. Like the original card I made this one a pop up as well.  You can see below that the card folds down when you open it and it has an unusual shape with the front cover not going all the way to the top.  The original card inspired me to create the piece this way.  


While I enjoy the look of vintage cards I just couldn't see making this one all frilly, lace and glitter....I instead chose a harlequin print stationary in my stash and some Spellbinder dies to create my own look


Below is a copy of the original card -  I have post cards from several holidays that were my Grandmothers. As I handle them I am always touched that she had family that loved her so and amazed at how well these cards still look at over 100 years old. 

Materials:  Computer, Spellbinders Dies, Cardstock, Designer stationary, rhinestones, vellum, embossing folder


Saturday, October 26, 2013

Vintage Santa Step Card

    Visit my blog often enough and you will begin to see that I love Step Cards and 3-D projects.  While perusing Pinterest recently I came across a card with this new shape I hadn't seen.  Her picture tutorial was nice, but it seemed to me a lot of paper was wasted in her layout.....so, I went to my handy dandy Silhouette Cameo and drew out a background to use.  This machine comes in soooo handy.  I not only now have this style of card ready to cut when I want -- I can also cut out my layered pieces to the correct proportions as well.  Often using scraps and laying them out for one run through.  Now that's efficiency.
   Vintage cards are usually not my style - but around Christmas time these images always appeal to me.  I have several post cards that were my Grandmothers, as well as some other images, that date back to around 1903 - 1912. I have made cards and ornaments from copies of several of them over the years.  This paper by K & C from last years holiday stash seemed perfect for this image.  The card when flat fits in an A6 envelope.  
     After making this one I decided to start another one - the next is going to have lots of glitter to make it a little more vintage looking - I'm thinking it will be very nice looking.  If I have a chance I'll try and post it.
Thanks for stopping by

Materials:  Copy Vintage Post Card, Computer, Spellbinders Label Die and Gold Label Four, Rhinestones, K & C DP, Pop Ups


Monday, October 14, 2013

With Sympathy

     While I enjoy creating cards I always find it a challenge to be asked for a Sympathy card....you want the card to reach out and touch the recipient, yet words are so difficult in those times.  My co-worker needed a card for her Aunt who lost an older daughter pretty suddenly.  As I surfed the net I came across a blog that had a poem that brought me to tears.  The woman posting it had lost a child and put this poem, she had received, on her blog because she was so touched by it.  There was no credit for who wrote it (I may have to Google further to find out and I will update that info if I find it).
     It was such a long poem I struggled with putting it on the inside of the card.  Should it be on vellum as an overlay on some lovely paper with hearts in the background, should it be shrunk down and made so small it couldn't be read?  Finally,  I decided it should be the background of the front of the card.  I printed it in grey ink and adjusted them so that the words went around the die I wanted to put in the middle -- two hearts, the poem ends with a reference to the heart.
     It is simple and yet I think it conveys a lot of heartfelt thought.  I kept the sentiment on the inside simple

Materials:  Computer, Spellbinder Die, Heart Embellishment, Cardstock

Wednesday, August 21, 2013

Wedding Invitations

     A few weeks ago a friend and member of our small group Bible study contacted me about helping her daughter with her wedding invitations.  Her daughter had an idea in mind using lace as a belly band and wanted to incorporate a vintage style post card with a special picture on it for the reply card. She wanted to know if I thought her ideas were do-able as well as asking me if I thought her daughter could do it herself.  She went on to ask if I would consider helping.  Well I love a good challenge and I have never done wedding invitations.
     At the initial meeting with this young couple I knew I would do whatever I could to help them.  He proposed to her under a tree on a property near where he grew up in the Northeast.  They very adamantly wanted to use a picture of the tree on the response card, and create a vintage look.  I had recently acquired PicMonkey for photo editing (a great program) and decided to incorporate the use of my Silhouette Cameo as well.  I created the post card.....and it looked pretty decent......but .....as I pinned I realized that the tree would probably look just as good on the invite.  The bride to be had informed me she wasn't the fru-fru type gal and the postcard had such a dominating look.  Soooo, I put together a prototype invite using the tree in the background.  Yep, it was a success.  We still used the tree on the front of the response card, but we put it in the invite face down so people could see both the information card and response card when the invitation was opened.

    Today we assembled the invites with the lace belly band and some twine (all part of the original idea) - we did decide during the planning process that there needed to be a little more on the front and decided on a monogram - once again done using my Silhouette (I'm telling you I LOVE this machine).  This whole project has been great fun and I have learned tons about using PicMonkey and my Silhouette. I'm happy, the brides happy, the mother of the bride is happy, life is good.


Supplies:  PicMonkey Photo Editor, Cameo Silhouette, Lace, Computer, twine


Friday, July 5, 2013

Happy Birthday

     I just wish to say that I LOVE my Silhouette Cameo - while I have only owned it a few months, and have nary a clue as to what it will really do, what I have been able to accomplish has sure made my life easier.
     My SIL will be turning 50 this month and I wanted to get a card made for her.  I've known her since she was 15 and I began dating her brother...she was a maid of honor in our wedding 33 years ago.  While it was tempting to make one of those real 'Oh my your over the hill' cards, I decided to use Art Impressions oh so cheerful bird, cough, cough......but more importantly I wanted to make a step card.
     While I have patterns for step cards I decided to use my Silhouette to make this one.  Oh my, how easy peasy.  I had purchased the cut file for this step card and decided to re-size it to a 5.5 x 5.5 card.  The file also contains the cuts for the side pieces as well as a circle and scallop.  It was oh so easy to re-size the layered pieces right on my machine.  Layers on my step cards have always been a challenge to me, it may be easier for others, but certainly not for me.  This machine made them a piece of cake - ALL proportioned the way they should be.  I did fussy cut my image after I colored him with my Copics - I hadn't at that point decided exactly how this card was going to be put together when I inked him up.
     Then I did a 'first' for me - I used the cut pieces in my file and manipulated them to make this inside cut that wasn't included with my purchase (imagine me grinning ear to ear in pride for this small accomplishment)!    Of course, I was also able to make, with a few clicks on my computer, the outer layer as well.  Before actually cutting this I typed my sentiment, scanned it, then placed it in my cut file, sent it all to the printer, then loaded my printed copy into my Silhouette and BAM a lovely layer for the inside of my card.
     Can I just say life is good!!  My file is now saved and when I decide to make another step card I just have to click, open, cut, and assemble.  Time to get this card ready for the mail.

Supplies:  Art Impression Stamp, Copics, Silhouette Cameo, Computer, Cardstock, scissors

Challenges:  Fab'n'Funky #178 Anything but a square, Word Art Wednesday 87 Anything Goes, Splitcoaststampers, F4A176


Sunday, June 2, 2013

Wedding Bells.....


        A co-worker requested a wedding card recently and when I think of wedding cards I always think white on white, flowers, pearls, and possibly butterflies.  So to make this little beauty I dug out my floral oval die from Spellbinders (a go to die on a pretty regular basis for me).  During a trip down the paper aisle at Jo-Ann Fabrics recently I found this lovely Ivory Floral on White Matte paper, it seemed perfect for a wedding or anniversary card.  After cutting my two Floral Ovals, I cut a regular Oval from some Pearl Vellum paper.  Once they were layered I generated my sentiment on the computer and then used Label 18 to cut around it, which I also backed with some Pearl Vellum paper that I fussy cut around to mimic the die shape.  The basic layout of the dies was inspired by a card I saw here by Sistersandie at Splitcoast Stampers.  I generated my own sentiment so I could match the fonts to the scripture I am putting on the inside.  Her easel card was very inspiring and beautiful.

Supplies:  Spellbinders Dies, Computer, Cardstock, Pearls, Vellum

Challenges:  Stampin' for the Weekend, Monochrome,

Sunday, May 12, 2013

Retro Fun

     The Featured Stamper at Splitcoaststampers this week is Silli - you can visit her gallery here.  She had posted a darling retro image on a card, that I first took note of several weeks ago. I have a few retro digis that I have been wanting to use and when I went through her gallery again today I thought what better card to CASE than hers to honor her as Featured Stamper. When I first purchased the patterned paper you see here I knew it was meant to have a retro image on it - how could it not - its called Happy Days!!  I used my Copics to give some color to the image, generated a saying for the front, and fussy cut around the cans from another sheet in the set.  I will be using this as a Birthday Card once I generate an appropriate saying for the inside.
     These retro images really are catchy - guess I'm getting old, this could be my mom in the kitchen when I was younger - I have a few more that are just as sweet and hope to get them on paper soon. Ya'll have a great day!!

Supplies:  Digi from Graphics Fairy, docrafts Happy Days Designerstax, computer, Spellbinders, Copics

Postede:  Splitcoaststampers FS337

Sunday, January 27, 2013

STOP, in the name of Love

     Sometimes I think my life and all my friends live in my computer....I spend so much time creating, then loading and sharing, following others on Facebook, Pinning, perusing Splitcoast Stampers to leave comments, and get inspiration. But yesterday those activities paid off....the image above was free from Mo's Digital Pencil if you happened to be a follower on Facebook - since I'm a follower how could I resist a free digi.  Of course as soon as I downloaded it I HAD to color it.  The challenge at Oozak this month is 'Pink and Bling' so I used that as my inspiration.  Yeah, the sentiment may seem a little 'corny' but you have to admit it fits the image....I have been tapping my foot all afternoon humming this tune as well.

Supplies:  Digi from Mo's Digital Pencil, Computer for sentiment, Copics, Rhinestones, Cardstock Recollections Amour, Spellbinders

Challenges:  Oozak #10 Anything Goes with Pink and Bling

Saturday, January 19, 2013

Talk about dirty....


Sue (aka as Irishgreensue or Greenie) and I were on the phone earlier today 'talking dirty' - YES, we were!  We were talking about our dirty stamping areas and how we needed to clean them up.  There was a debate as to whether one is more creative working with a mess around them - or does one do better if things are all in place.  I for one TRY very hard to keep things in their place, but sistah's it just doesn't work.  I think that is why some of those Jammer Town girls like being on Pinterest so much....they have these 'boards' where they pin these fancy schmancy, VERY organized, ALL white, craft rooms, and they dream of having a room just like the ones they pin.  I look at those and say - Wow, how nice, however does one work in a room like that ??!!

So after all that 'dirty talk' and since Jammer Town (here) has been soooooo QUIET of late, I thought I would clean up my craft table, but 'oh wait'....I think maybe I should color just one more card.

This ones for Greenie, ya know, she is all recovered from her knee surgery - just look at her with that leg in the air showing off!!  She has been walking diligently every day.  The only thing she can lift higher than her leg is a drumstick - gotcha Green one.

Supplies:  Bugagoo Digi, copics, stickers, computer, cardstock

Friday, January 18, 2013

Sisters

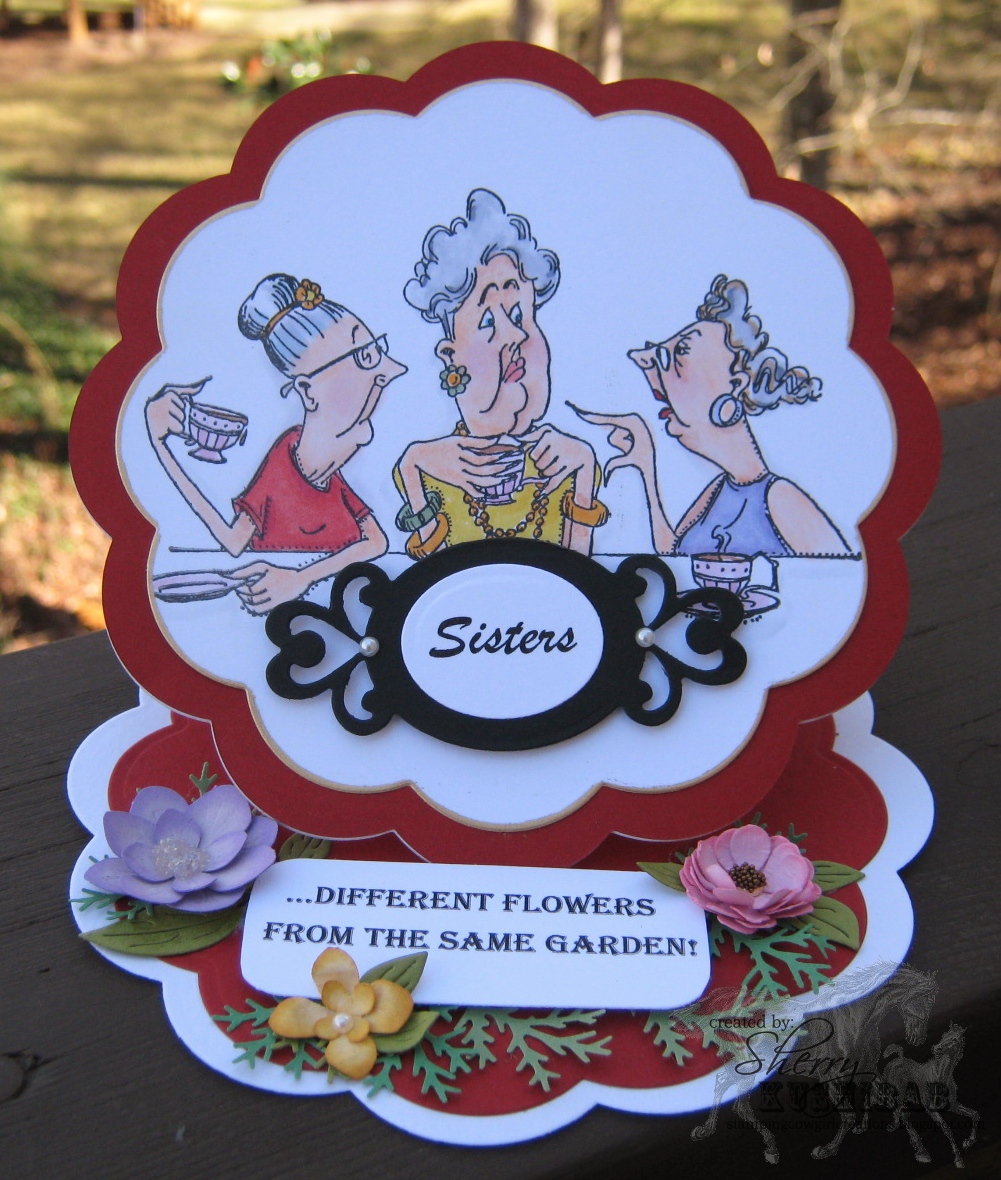
     Yes, I am one of those crazies who "Pins" - it can be crazy addicting, but this card is proof that it can be inspiring as well!!  As I hopped from board to board of various "Pinners" I came across the above sentiment.
     I have two sisters, one older, one younger.......I have not lived near them in years but we have always managed to stay in touch and visit.  We have even done several 'sister trips' together over the years as well.  As I was coloring this adorable image by Art Impression a few weeks ago I couldn't help but think of my sisters.  We are sooo different, and yet we are only a phone call (and occasionally a flight) away from each other if the need arises.  I will have to admit that my older sister is known to be the 'control freak' between the three of us - so it is no surprise as I was coloring these ladies I imagined her to be the one with the finger wagging, setting us straight on some matter or another.
    So now you know why when I saw this saying I just HAD to push back from the computer and sit my butt in front of my stamp table and create.  It just seemed natural to make this into an easel card for the sentiment to make sense......the little posies surrounding this are all made by moi :)  (On the bar at the top of my blog is a link to a picture tutorial I have on making some of my flowers)
     I will have to confess I don't know if I have the energy to put another one together, so this may go to the older sister - she is pretty creative herself and always appreciate the cards I send her.

Supplies:  Art Impression Golden Oldies Girls, Spellbinders, Cheery Lynn, Martha Stewart Punch, Copics, Computer


01 09 10