Friday, July 26, 2013

Hush little baby don't you cry.....

     You have no idea IRL how adorable this little fella looks.  When I discovered that Bambino from Sugar Nellie was available as a digital, I swear I swooned!!  This is an image I have coveted for sometime, to be able to own it as a digi - well I could hardly contain my excitement.
    Upon discovering this image I immediately purchased and downloaded it - before printing I adjusted my print settings to print in a light grey ink.  When coloring an image like this, one would like to take credit for the beauty of it, but the image is so wonderfully drawn that, using my Copics, it took very little talent on my part to bring him to life.
    I must confess that the background was made using my Silhouette Cameo with a pattern from Lori Whitlock, and was sitting on my desk from a few weeks ago (since it was blue that is what determined this little cutie would be a boy).  The card was originally going to be used for a birthday card that I later decided I wanted bigger - so I resized the pattern on the Cameo and made another step card to use.  I sat this on the shelf waiting for future use.  Waste not, want not.
     Honestly, I am so crazy about this image I had trouble even wanting to put anything around him.  Digging into my stash of embellishments I came across these sweet little buttons that have been waiting a LONG time to be used, then I settled on a small sentiment from an old Fiskars Baby set.
     This card will be thrown into the challenge at Use It Tuesday where they challenge you to use what you have.  I also meet the challenge at Creative Inspirations for their Bingo call using Ribbon, Sentiment, and Buttons from the first row of their challenge - used them all in a row on my card as well :)
     Now I hope someone has a little boy soon so I can put him in the mail!!

Supplies:  Digital Image Sugar Nellie, Ribbon, Buttons, Fiskar Stamp, Spellbinders dies, Silhouette Cameo, Lori Whitlock Pattern for Silhouette, Cardstock, Copics

Challenges:  Use It Tuesday #60,  A.R.T #7, Craft Den #97, Fussy & Fancy #94 More than one fold,  Creative Inspirations #224 Bingo

Sunday, July 21, 2013

King of the Jungle

   Had a little fun joining in on the Inspiration Challenge at Splitcoaststampers from yesterday (IC398).  After finding a lion charm at Persona for my inspiration I quickly decided to try out this 3-D lion card from Robert Subuda.  Once again I put my Silhouette to work.  After downloading the design from the web, I scanned it and loaded it into my Silhouette for cutting.  To save on some coloring time I cut this from some colored cardstock and then used my Copics to color some of the areas for highlighting.  He is just too cute and has been fun to open and close - keeps me giggling. He is going to be a Birthday card......I got a little carried away with the background layers he is on......may have to pay a little extra postage, but sure worth it.

Supplies:  Silhouette Cameo, Copics, Cardstock, Glue, Robert Subuda pattern


Sunday, July 14, 2013

Big Green Tractor

    YES, another card with my Silhouette.  No, I haven't forgotten how to stamp - I recently received a request from a sister stamper for some prayers and a card to cheer up a sweet lil 4 year old boy who is very ill. One day he looks fine and the next his mom notices he doesn't seem to be himself, a trip to the ER, several tests and within two days they admit him to the hospital, fly him to a different hospital and he is receiving chemo through the spine.  Apparently he has Burkitts Lymphoma, it comes on quickly and progresses just as quickly - he is being lifted up in prayer and we want to cheer him up.  He loves the color green and likes tractors. Needles to say us stampers want to make him something that will bring a smile to his face.

     Not having any tractor stamps I had to move to plan two - my Silhouette.


      After re-sizing my tractor file that I purchased for .99 from Silhouette I got the paper ready to be cut for my card.

    Don't ya love it - here it is after it has been cut.  I had already cut my white base with a fold.  I was able to create the base by making a mirror image of part of my file and then welding the images together. I then decided to personalize the tractor and cut the young mans name out with the Silhouette as well.


   After layering all my pieces I just couldn't resist using some Action Wobbles on the wheels.  If you haven't used a Wobble they are a great little addition to a kids card.....they are a small plastic spring that has adhesive on each end. I mounted one under each wheel, just a little flick of the finger and the wheel will 'wobble' around.  Nothing like a little interaction with the card to cheer a four year old up.


    Last but not least, I generated another shape, as well as the sentiment on my Silhouette, sent it to my printer and fed it into the Silhouette to cut.......This will go in the mail tomorrow and he will be in my prayers for many mornings to come.

Supplies:  Silhouette Cameo, Cardstock, Action Wobbles, Xyron Machine

Bloomin' Fun


     Oh yeah - still loving my Silhouette.  A co-worker requested a Retirement card for her mother.  I wanted to do something a little different. The flower pot and insert were purchased from Silhouette and are designed by Lori Whitlock.  While the flowers she has with that file are nice, they are just a little too one dimensional for my taste.  So, fortunate for me I had another file I had purchased (also by Lori) for a 3-D flower.  These were much more suited to my needs and with the click and drag of my mouse I was able to take her large flower, and scale them to the size I needed. Oh the joys of the Silhouette.  After cutting my flowers I used my stylus to shape them and bend the edges....then I layered them together and added some small glass beads to the center.  They flowers didn't quite fill the space, which was fine I wanted it to look like a pretty busy pot of flowers, so I added a few flowers from Recollections. Then I die cut a few leaves and shaped them, as well as punching a few pieces of greenery from a Martha Stewart leafy punch.  Then I adhered them to the background piece - on some of the pieces I used my Collal glue to keep the leaves raised.

      I assembled this pot, and then used my Silhouette to type a sentiment, and print and cut it to the size I needed for the inside. Adding to the reality of this bouquet I placed a little 'lady bug' in the corner.  Of course this card is a little thick with all those sweet blooms so I handcrafted a box to put it in with a belly band around the middle. My co-worker was pleased.

Supplies:  Silhouette Cameo, Lori Whitlock Designs, Recollection Flowers, MS punch, Button, Glass beads, Embossing folder, Ribbon, Collal glue. 

Challenges:  One Stop Craft Challenge - Summer Colors, Word Art Wednesday #88

Monday, July 8, 2013

Thank you.....

     Oh yeah, can we just say AGAIN......I am lovin' my Silhouette Cameo.  While playing with my Silhouette today (there is sooooo much to learn) I came across a blog where they have monthly challenges using the Silhouette.  This was just the opportunity I needed to push myself to try something new - faux stitching with my Cameo.  While I have watched many tutorials and knew that I could print and cut, I really didn't fully understand what I could really do with this baby.  Today I drew my own rectangle, filled it with my color choice, did some other fancy schmancy button clicking to add some stitching and made my card background.  Of course the proportions are all to scale since I also cut the dark brown after tracing my original drawing.  Then I loaded a tag that came with my machine, choose a coordinating color to my background and poured it in, did some more fancy schmancy button clicking and created some more faux stitching and then sent this to the printer for printing, loaded it into my Silhouette and cut.  I have to take credit for fussy cutting the boots after I stamped and colored them (Stampin Up can be a little fussy about digitally reproducing their images).  The boots were placed on pop up foam and placed over an image stamped on the card so I wouldn't lose the shadowing of the original stamped image.  Some words were added with a stamp to my tag and my card was finished.
     No it is not a real fancy card......but I am just thrilled with the print and cut option and LOVE the faux stitching affect......I know I will use this more.  Entering this in the challenge at Silhouette Challenges.  

Supplies:  Silhouette Cameo, Stampin Up Wild West, Pop ups, White and Brown Cardstock, Copics

Challenges:  Silhouette Cameo - Faux Stitching, 

Friday, July 5, 2013

Happy Birthday

     I just wish to say that I LOVE my Silhouette Cameo - while I have only owned it a few months, and have nary a clue as to what it will really do, what I have been able to accomplish has sure made my life easier.
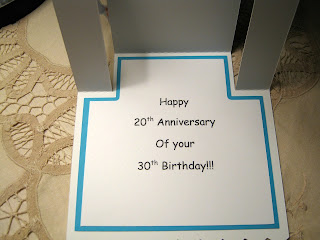
     My SIL will be turning 50 this month and I wanted to get a card made for her.  I've known her since she was 15 and I began dating her brother...she was a maid of honor in our wedding 33 years ago.  While it was tempting to make one of those real 'Oh my your over the hill' cards, I decided to use Art Impressions oh so cheerful bird, cough, cough......but more importantly I wanted to make a step card.
     While I have patterns for step cards I decided to use my Silhouette to make this one.  Oh my, how easy peasy.  I had purchased the cut file for this step card and decided to re-size it to a 5.5 x 5.5 card.  The file also contains the cuts for the side pieces as well as a circle and scallop.  It was oh so easy to re-size the layered pieces right on my machine.  Layers on my step cards have always been a challenge to me, it may be easier for others, but certainly not for me.  This machine made them a piece of cake - ALL proportioned the way they should be.  I did fussy cut my image after I colored him with my Copics - I hadn't at that point decided exactly how this card was going to be put together when I inked him up.
     Then I did a 'first' for me - I used the cut pieces in my file and manipulated them to make this inside cut that wasn't included with my purchase (imagine me grinning ear to ear in pride for this small accomplishment)!    Of course, I was also able to make, with a few clicks on my computer, the outer layer as well.  Before actually cutting this I typed my sentiment, scanned it, then placed it in my cut file, sent it all to the printer, then loaded my printed copy into my Silhouette and BAM a lovely layer for the inside of my card.
     Can I just say life is good!!  My file is now saved and when I decide to make another step card I just have to click, open, cut, and assemble.  Time to get this card ready for the mail.

Supplies:  Art Impression Stamp, Copics, Silhouette Cameo, Computer, Cardstock, scissors

Challenges:  Fab'n'Funky #178 Anything but a square, Word Art Wednesday 87 Anything Goes, Splitcoaststampers, F4A176


01 09 10